first „my package of the day“ republished on debaday

Just for your information as some people moaned about my „my package of the day“ series: A first article about „file“ has been republished there, more will follow and I am really happy contributing to this project. But let me add that I will continue introducing you right here to some of my favorite software packages as there are three major reasons:

  1. Some packages already have been described on debaday and therefore won’t be pushed a second time. As times change and people focus on different features when talking about software I see no problem in repeating package description with other words and even images.
  2. The debaday team tries to distribute the articles they get as good as possible. This means that between publication there can be a gap of some days. As you might understand, when writing a blog article you are most times yearning for hitting the „publish“ button and see what the crowd says.
  3. The republication on debaday shows, that a cooperations works really fine and there is no need to bother around.

So, thank you guys for reading and commenting and thank you, debaday team, for the wonderful work.

my package of the day – htop as an alternative top

„top“ is one of those programs, that are used quite often but actually nobody talks about. It just does its job: showing statistics about memory, cache and cpu consumption, listing processes and so on. Actually top provides you some more features like batch mode and the ability to kill processes, but it’s all quite low level – e.g. you have to type the process id (pid) of process you want to kill.

So, though an applications like top makes sense on the console, a more sophisticated one would be great, extending the basic top functionality with enhancements to it’s usage. This tool already exists: It’s the ncurses based „htop“ and we’ll have a closer look at it now.

For the beginning: Install „htop“ by running „aptitude install htop“, Synaptic or the package manager of your choice. As you can see, htop is quite colorful, which is, of course, a matter of taste. In my opinion, colors make sense, when the they mean something or provide better readability. So let’s check the output in brief:

htop1.png

At the upper left corner you see statistics about the usage of cpu cores (in my case there are two of them, marked „1“ and „2“), memory and swap statistics, while on the right side, you have the common uptime/load stats. The interesting part is the usage of colors in cpu/ram/swap bars. If you are new to htop you have to look the colors up at least once. Therefore just stroke „h“ („F1“ should work, too, but Gnome might get in your way) and you’ll see a nice explanation in the help:

htop2.png

Quite interesting is the distribution between green and red in the cpu stats, as a high kernel load often means something goes wrong (with the hardware i/o for instance). In the memory bar the real used ram is marked green – blue and orance actually could be cleared by the kernel if necessary. (People are often confused that their ram seems to be full, when calling a tool like/htop though they are not running that many programs. It’s important to understand, that the memory is also used for buffering/caching and that this memory can often be used by „real“ data later on).

So what’s the next htop feature? Use your mouse, if you like! You can test it by clicking on „Help“ on the menu bar at the bottom. Maybe while clicking around a bit you already noticed that you can also click on processes and mark them. What for? Well, htop enables you to kill processes quit easy, as you don’t have to type a process id, write a pattern or something, you just can mark them with a mouse or cursor and either click on „Kill“ in the menu or stroke the „F9“ or „k“ key. „htop“ will let you choose from a list of signals afterwards:

htop3.png

Of course you cannot kill processes that belong to your user when htop does not run as root (i.e. with „sudo“). „htop“ marks processes that belong to user it is run by with a brighter process id:

htop4.png

Sadfully this also means, that running htop as root/sudo, marks processes that belong to non-root with a darker grey. But hey, that’s a nice missing feature for patch, isn’t it?

If you like to become an advanced htop user, you can check the „Setup“ menu (click it or press the „F2“ or „S“ key). You will see a menu for configuring the output of htop, enabling you to switch off and on the display of certain information:

htop5.png

Of course you can also sort the process list (click „Sort“ or press „F6“) which give you a list of possible sort parameters:

htop6.png

In spite of this, you can switch to a process tree display and sort it by pressing one of the keys showed below:

htop7.png

So let me give you a last nice gimmick and then end for today: You can try to attach „strace“ to a running process by marking the process typing „s“. If you don’t know, what strace is, don’t bother, if you do, you will probably like this feature pretty much.

I hope you got the clue about using htop, which is a really neat, full featured console top replacement that is even worth to be used when running X as it supports mouse usage and brings everything you need while still having a small footprint. If you have alternatives, you like mention, feel free to drop them as a comment.

my package of the day – mtr as a powerful and default alternative to traceroute

Know the situation? Something is wrong with the network or you are just curious and want to run a „traceroute“. At least under most Debian based systems your first session will probably look like this:

$ traceroute www.ubuntu.com
command not found: traceroute

Maybe on Ubuntu you will at least be hinted to install „traceroute“ or „traceroute-nanog“… To be honest, I really hate this lack of a basic tool and cannot even remember how often I typed „aptitude install traceroute“ afterwards (and press thumbs your network is up and running).

But sometimes you just need to dig a bit deeper and this time the surprise was really big as the incredible Mnemonikk told me about an alternative that is installed by default in Ubuntu and nearly no one knows about it: „mtr„, which is an abbreviation for „my traceroute“.

Let’s just check it by calling „mtr www.ubuntu.com“ (i slightly changed the output for security reasons):

                 My traceroute  [v0.72]
ccm        (0.0.0.0)          Wed Jun 20 6:51:20 2008
Keys:  Help   Display mode   Restart statistics   Order
of fields      Packets               Pings
 Host        Loss%   Snt   Last   Avg  Best  Wrst StDev
 1. 1.2.3.4   0.0%   331    0.3   0.3   0.3   0.5   0.0
 2. 2.3.4.5   0.0%   331   15.6  16.3  14.9  42.6   2.6
 3. 3.4.5.6   0.0%   330   15.0  15.5  14.4  58.5   2.7
 4. 4.5.6.7   0.0%   330   17.5  17.3  15.4  60.5   5.3
 5. 5.6.7.8   0.0%   330   15.7  24.3  15.6 212.3  30.2
 6. ae-32-52 58.8%   330   20.6  22.1  15.9  42.5   4.7
 7. ae-2.ebr 54.1%   330   20.6  25.0  19.0  45.4   4.7
 8. ae-1-100  0.0%   330   21.5  25.4  19.2  41.1   5.1
 9. ae-2.ebr  0.0%   330   27.5  34.0  26.7  73.5   5.2
10. ae-1-100  0.3%   330   28.8  33.6  26.7  72.5   6.0
11. ae-2.ebr  0.0%   330   30.8  32.9  26.7  48.5   5.0
12. ae-26-52  0.0%   330   27.6  34.8  26.9 226.8  26.8
13. 195.50.1  0.3%   330   27.7  28.4  27.2  42.5   1.7
14. gw0-0-gr  0.0%   330   27.9  28.1  27.0  40.5   1.4
15. avocado.  0.0%   330   27.8  28.0  27.2  36.2   1.0

You might notice, that the output is quite well formed („mtr“ uses curses for this). The interesting point is: Instead of running once, mtr continuously updates the output and statistics, providing you with a neat network overview. So you can use it as an enhanced ping showing all steps between you and the target.

For the sake of it: The package installed by default in Ubuntu is actually called „mtr-tiny“ as it lacks a graphical user interface. If you prefer a gui you can replace the package with „mtr“ by running „aptitude install mtr“. When running „mtr“ from the console afterwards you will be prompted with a gtk interface. In case you still want text mode, just append „–curses“ as a parameter.

Yes, that was a quick package, but if you keep it in mind, you will save time, you normalle spend for installing „traceroute“ and you’ll definitely have better results for network diagnose. Happy mtr’ing!

[update]

sherman noted, that the reason for traceroute not being installed is, that it’s just deprecated and „tracepath“ should be used instead. Thank you for the hint, though I’d prefer „mtr“ as it’s much more reliable and verbose.

my package of the day – gpg for symmetric encryption

Though asymmetric encryption is state of the art today, there are still cases when you probably are in need of a simple symmetric encryption. In my case, I need an easy scriptable interface for encrypting files for backup as transparent as possible. While you can, of course, use asymmetric encryption for this, symmetric methods can save you a lot of time while still being secure enough.

So there are methods like stupid .zip encryption or a bunch of packages in the repositories like „bcrypt“ that provide you with their implementations. But there is a tool, you already know and maybe even use, but don’t think of when considering symmetric encryption: „gpg„. Actually gpg heavily relies on symmetric algorithms as you might know. The public/private key encryption is a combination of asymmetric and symmetric encryption as the latter is quite more cpu efficient. In our case, gpg will use the strong cast5 cipher by default.

Encrypting

So as gpg already knows about a bunch of symmetric encryption algorithms, why not use them? Let’s just see an example. You have a file named „secretfile1.txt“ and want to encrypt it:

$ gpg --symmetric secretfile1.txt

You will be prompted for a password. Afterwards you’ll have a file named secretfile1.txt.gpg. You are already done! Please note: The file size of the encrypted file might have decreased as gpg also compresses during encryption and outputs a binary. In my test case the file size went down from 700k to 100k. Nice.

Armoring

In case you need to have an easy portable file that is even ready to be copy-pasted, you can ask gpg to create an ascii armor container:

$ gpg --armor --symmetric secretfile1.txt

The output file will be called „secretfile1.txt.asc“. Don’t bother to open it in a text editor of your choice. The beginning will look similar to this:

$ head secretfile1.txt.asc
-----BEGIN PGP MESSAGE-----
Version: GnuPG v1.4.6 (GNU/Linux)

jA0EAwMChpQrAA/o8IFgye1j3ErZPvXumcnIwbzSvENDD/fYlWMRiY/qqvn949kV
+mo/v+nQi7OFrrA45scQPuPbj8I1T+2f7XAT4ouW2kuHIJ/2zkyrxBMvO04fDH82
273NwUrXd/s+JJXe+wJz149K324rE7+FIHvfImiez8lRs5qyRI/drp/wFK8ZHRvF
gzhDGaTe8Dgj1YqHgWAY4eAjrXhYLI1imbIYrV1OVPia6Roif37FV7C1AT/i/2HX
2ytI2mBhQLdqkSVeqXZ74lgZhsitnOeqZH65IuTLi77PUcroFOuefw6+4qSpMIuM
8dyi4jCqQ1jCR7PRorpGvm3RtXhlkB689vrknKmOa5uztTj3MGrPOgC6jegBpu/L
3419sAxRtw8bj2lP76B+XXPZ2Tuzpg01hC/BWlifSexy+juYXv7iuF5BuQ1z7nTi

(In this case I used ‚head“ for displaying the first ten lines. Head is similar to tail, which you might already know.) Though the ascii file is larger than the binary .gpg file it is still much smaller than the original text file (about 200k in the above case). When tampering with binary files like already compressed tarballs the file size of the encrypted file might slightly increase. In my test, the size grew from a 478kB file to a 479kB file when using binary mode. In ascii armor mode the size nearly hit the 650kb mark, which is still pretty acceptable.

Decrypting

Decrypting is as easy. Just call „gpg –decrypt“, for instance:

$ gpg --decrypt secretfile1.txt.gpg
# or
$ gpg --decrypt secretfile1.txt.asc

gpg knows by itself, if it is given an ascii armored or binary file. But nevertheless the output will be written to standard output, so the following line might be much more helpful for you:

$ gpg --output secretfile1.txt --decrypt secretfile1.txt.gpg

Please note, that you need to stick to the order first –output, then –decrypt. Of course you can also use a redirector („>“).

Piping

So, for the sake of it: The real interesting thing is that you can use gpg symmetric encryption in a chain of programs, controlled by pipes. This enables you to encrypt/decrypt on the fly with shell scripts helping you to write strong backup scripts. Gpg already detects, if your are using it in a pipe. So let’s try it out:

$ tar c directory | gpg --symmetric --passphrase secretmantra \
| ssh hostname "cat > backup.tar.gpg"

We just made a tarbal, encrypted it and sent it over ssh without creating temporary files. Nice, isn’t it? To be honest, piping over ssh is not a big deal anymore. But piping to ftp? Check this:

$  tar c directory | gpg --symmetric --passphrase SECRETMANTRA \
| curl --netrc-optional --silent --show-error --upload-file - \
--ftp-create-dirs ftp://USER:PASSWORD@SECRETHOST/SECRETFILE.tar.gpg

With the mighty curl we just piped from tar over gpg directly to a file on a ftp server without any temporary files. You might get a clue of the power of this chain. Now you can start using a dumb ftp server as encrypted backup device now completely transparently.

That’s all for now. If you like encryption, you should also check symmetric encryption and the possibilities of enhancing daily business scripts security by adding some strong crypto to it. Of course you can complain about the security of the password, the possible visibility via „ps aux“, but you should be able to reduce risks by putting some brain in it. In the meantime check „bashup„, the bash backup script, which uses methods described here to provide you with a powerful and scriptable backup library written in Bash with minimum depencies. And yes, gpg will be added soon.

Don’t complain about it – make it better? Bug Jamming for a better tomorrow

Agreed, that was too much pathetic. But you got the point, didn’t you? Free software like every software is full of bugs and possibilities for enhancements. So is Ubuntu. But that’s okay, because we have the power to change it. No need to be a developer, no need to be an ubernerd. All you have to do is to spent some time. Need somebody to motivate you? Want to do it in a group? Then a Bug Jam is perfect for you!

No, it’s not a jam made of bugs :) It’s a get together where people work on eliminating software bugs by spending some time reading bug descriptions, checking them, writing new ones, informing developers about bugs or even patch the software by themselves. The Ubuntu community crew tries to push these events as they really help you to kick your ass and just get started as it’s much easier to get into the bug business in a group and it makes a lot of fun. And of course bugs fixed in Ubuntu can be ported to Debian and upstream quite often.

All you for a Bug Jam is… Ah, just come to one of the four Bug Jam irc sessions taking place in the next weeks, held by some Ubuntu people who already have some experiences with Bug Jamming and Ubuntu related events (I will support Daniel Holbach on two of them, one this Friday, 16:00 UTC). See the schedule on Daniel’s blog entry.

And keep in mind:

1. There is the 5-a-day project where you and your loco team, group or whatever can make a difference and pop up on the first line of the statistics.

2. There will be a Global Bug Jam which will be the first and biggest of it’s kind so far and you can be part of it.

Hope to see you there.


My 5 today: #156204 (pidgin-otr), #130443 (pidgin-otr), #144770 (pidgin-otr), #240420 (ubuntu), #231660 (ubuntu)
Do 5 a day – every day! https://wiki.ubuntu.com/5-A-Day

my (not yet) package of the day – circular application menu

(Not yet a package, but still interesting enough to tell and hey: bleeding edge.) Circular Application Menu for Gnome is a Google Code hosted project providing a different access method to your Gnome menu. Actually all it does, is displaying the menu as circles:

hauptmenuecircular.png

Installation

But as it is different, it is somehow attractive and therefore let’s give it a try. Building „circular application menu“ is quite easy. You just have to install some libraries, subversion and essential build stuff, check out the current repository and compile it. Huh? Try this:

$ sudo aptitude install subversion build-essential \
libgnome-desktop-dev libgnome-menu-dev
$ svn checkout \
http://circular-application-menu.googlecode.com/svn/trunk/ \
circular-application-menu
$ cd circular-application-menu
$ make

Running

If no severe error occurred, you are already able to run „circular application menu“ it via ‚./circular-application-menu‘ now. Ignore error messages on the console as long as it comes up. Strange feeling to use it, isn’t it? I haven’t decided, if I really like it or not, until now.

If you like you can now install it to the system via make install, though I am fine with running it from the build directory, which I moved to „~/opt/circular/“. As it is pre-alpha-something, I just don’t want the code be mixed up with my distribution binaries.

Customizing

If you want to go one step further, install the Avant Window Navigator („$ sudo aptitude install avant-window-navigator“), the OS X style application panel, which just moved from Google Code to Launchpad (points taken!) and add an icon for circular menu to it by doing a right-click=>settings=>Launchers=>Add. Now you can start all normal applications by calling Circular Menues from the AvantGo launcher. Definitely an eye catcher:

Circular Application Menu combined with Avant Window Navigator
(click to enlarge)

Pitfalls

There are, of course, a couple of pitfalls. For instance, when running circular application menu on top of a dark or even black application, you cannot see it’s borders:

bildschirmfoto-1.png

Also, you currently don’t have the possibility to customize the launcher at all.

Nevertheless: circular application menu for Gnome is a nice desktop gimmick. I am sure, it will be packaged soon (will I?) and go to the community repositories of most GNU/Linux distributions.

my package of the day – sash – the Stand Alone SHell for system recovery

Let me introduce you today to a package that is quite unknown as you hopefully never need it. But when you need it and have not thought about it before, it is probably already too late. I am talking about „sash“ – the „Stand Alone SHell“. Yet another shell? Yes and no. Yes it is a shell, but no, I am not trying to show something like the shiny friendly interactive shell or (my favorite) „zsh“. Quite the contrary: You can give „sash“ a lot of attributes, but not „shiny“.

So what is about? Imagine the following case: You are running a machine and suddenly something goes totally wrong. Partition errors, missing libraries, you have messed around with libc, whatever. This can get you into serious trouble. You are fine, when you have the possibility to boot a recovery cd or something similar. But under some circumstances you might have to stick to the programs already installed though they seem to be broken. Maybe it is a virtual server somewhere on the web and you are only allowed to boot into a recovery mode giving you a prompt to your server. So you are trying to login as root but it just does not work for some reasons. Broken dependencies. Who knows.

The point is: When you login onto a machine for system recovery, you are already relying on a lot of tools and dependencies – though it only seems to be a shell. The shell might be linked against a couple of libraries, a lot of commands you want to run are not build in and therefore a bunch of external dependencies can bar your way. So what you actually might need in a situation of severe pain is a shell that provides you with as much essential tools as you need on its own without relying on external code.

Installing sash

This is where „sash“ comes into play. Sash is not a dynamic linked executable, it has actually all needed features built in. So as long as you can execute the sash binary, you can have a working shell. Let’s check it! Install „sash“ by using „aptitude install sash“ or you preferred package manager. Please note, that sash will clone your current root account:

cloning root account entry to create sashroot account in /etc/passwd
Cloned sashroot from root in /etc/passwd
cloning root account entry to create sashroot account in /etc/shadow
Cloned sashroot from root in /etc/shadow

So you have this new line in your /etc/passwd:

sashroot:x:0:0:root:/root:/bin/sash

You should consider giving sashroot a password if you want to be able to login with this account. But please check if this applies to your security needs.

See the difference

Now let’s check how the sash binary differs from the standard shell, the bash and the zsh. We are using „ldd“ for this, as it is lists libraries, an executable is linked against:

bildschirmfoto-terminal.png

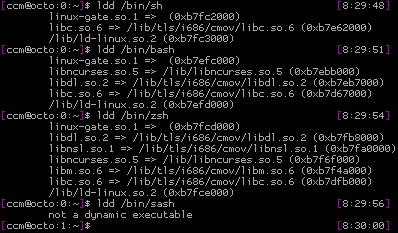
Pretty impressive. All „normal“ shells have at least three dependencies, sash apparently has none.

But getting rid of external libraries is not the only difference sash makes. Another major feature is the collection of built-in commands:

-ar, -chattr, -chgrp, -chmod, -chown, -cmp, -cp,
-dd, -echo, -ed, -grep, -file, -find, -gunzip,
-gzip, -kill, -ln, -ls, -lsattr, -mkdir, -mknod,
-more, -mount, -mv, -printenv, -pwd, -rm, -rmdir,
-sum, -sync, -tar, -touch, -umount, -where

Seems like a list of commands you yearn for, when in recovery mode, don’t you? Note the leading „-“ at the beginning of those commands. This is the way, sash handles your attempts to run internal and external commands. When using „mv“, sash gives you the normal /bin/mv, when using „-mv“, sash provides you with it’s own replacement. But „sash“ helps you when you don’t want to type the „-“ at the beginning of every command. You can enter „aliasall“ in a sash session as it will create non permanent aliases for all builtin commands:

bildschirmfoto-terminal-1.png

Emergency

In case of an emergency you might need to boot directly into sash as maybe your initrd stuff is broken. How? Just append a „init=/bin/sash“ to your kernel command line – be it lilo or grub. This way, you will be directly dropped into a sash session.

What’s missing?

Sadfully one essential command is missing: fsck. As the sash manual points out: fsck is just way too big to be included in a statically linked binary. Sad, but true. But hey: Better being to able at least to act on the console than having no console at all.

Sash as a standard shell?

… is not a good idea. It just lacks a lot of features you’ll really want when working on the command line: A verbose prompt, command history, tab completion and so on.

So it’s to install sash now as you will miss it, when it’s too late :)
(And just if you’d like to ask: Yes, at least once I really needed sash and it helped me to save a lot of time.)

First BBJ – Berlin Bug Jam – with MOTU Daniel Holbach on Monday, 16th of June at c-base Berlin

Ubuntu Berlin ist proud to present you the first BBJ: A „Berlin Bug Jam“ with Ubuntu MOTU Daniel Holbach, who will rock the place, for sure. Don’t know what a „Bug Jam“ is? Well, imagine it as a gettogether for working on bugs in a team. That does not mean, you have to be a developer: Everybody is welcome, who can do things from testing bug reports, triaging, patching or just wants to see how it all works. So this will rather be an „event“ than a lecture/workshop and provide you with a lot of fun and knowledge. If you want to see a detailed description of a bug jam, check the wiki page.On the BBJ, we will try to persuade to join the 5-A-Day project, motivating people to continuously enhance the Ubuntu Distribution and helping you to spread the word (and yes, to compete if you like) by trying to work on five bugs every day. Let’s see, if we succeed…

Feel free to bring your notebook along. We have power and free wifi, of course.

Event: 1. Berlin Bug Jam (BBJ) with Daniel Holbach
Location: c-base Berlin, Rungestr. 20
Date: 16th of June
Time: 18:00

Please note: If you want to support the Global Ubuntu Bug Jam, which is taking place from 8th to 10th of August,
this is a perfect possibility for you to gather some hands on
experiences. Of course, Ubuntu Berlin, will bring up a great lineup and
event for the Global Bug Jam. We are already working on it.

my package of the day – aiccu (and sixxs.net) for IPv6 connectivity

It’s time: No reason should prevent you from adding IPv6 connectivity to your machine – desktop, notebook or server. Of course it is still an issue, as most internet service providers don’t provide native IPv6 yet. So in most cases the easiest way for you is setting up an ipv6 tunnel to a IPv6 broker. There are currently several IPv6 brokers around providing you with IPv6 access for free. Let me, in short, show a simple way of getting this with the package „aiccu“ and the IPv6 broker „Sixxs“.

Apply for an account

First you have to apply for an account on SixXS. Go to sixxs.net and sign up for a new account. Please note: As Sixxs is kind of an ISP, they really need valid customer information from you. If you provide them with a link to your Xing or LinkedIn profile they’ll give you even more credits.

Your application will be checked and (probably) given access. Wait for the mail. Afterwards log in with the credentials on the SixXS site and request a new tunnel and decide for an entry point close to you. Also this step needs to be approved. Wait for the mail, it will take upto a day. Now you should have a Sixxs account, an approved tunnel request and of course login credentials for Sixxs.

Set up aiccu

Now let’s get it running. Install the package aiccu via „aptitude install aiccu“. During installation you will be asked, which broker you are using. SixXS is already preconfigured. Nice, isn’t it? So choose SixXS and provide your credentials. If everything is fine, aiccu will check SixXS and ask for your tunnel data. If you did not get an error message, you are already done!

Open a terminal and run „ifconfig sixxs“ – it should show a new network interface with an IPv6 address. Now let’s check, if you have really access to IPv6. Open Firefox and go to www.kame.net. If the turtle logo is moving, your are using IPv6, if it does not, you don’t.

The SixXS credit system

Please note: When using SixXS you should understand it’s point system. For every action like requesting a tunnel or even a subnet, you will be taken points. For running a stable connection, you will be given points. This should motivate you to really use the service. Check it.

Security issues

Also note that all your IPv6 traffic will be directed through the broker. Of course you should check your security. As a tunnel with aiccu will „break“ a router (filtering on firewalls won’t grab the IPv6 data), you have to take care of the security by yourself on the machine which has IPv6 access.

IPv6 content

How to continue? Check www.sixxs.net/misc/coolstuff/ for interesting IPv6 only content. Yes, there are services on the web providing you with nice content via ipv6, for free. For instance access to high traffic news servers, access to a IPv6 freenode server and so on. Always keep in mind, that not every application yet is ready for IPv6 or needs to be configured to allow IPv6. With Debian/Ubuntu at least you should be able using Firefox, Thunderbird, the newsread Pan and Irssi as a start.

Happy networking!

[update]

Tiago mentioned in the comments, that he set up a wiki page explaining the IPv6 in detail. See https://wiki.ubuntu.com/IPv6. A really nice howto, which’ll probably work for most Debian based systems.

my package of the day: mpd – the Music Player Daemon

There are dozens of nice music players around, that’s for sure. You can choose between featur rich killer applications like Rhythmbox or Amarok, use old-school but up to date standards like XMMS or even a console classic like mp3blaster. Most of the standard players have in common, that the interface and the player itself are the same. That’s normal and therefore everything is fine. But maybe you are in a situation where you prefer playing music on a remote machine, only have a console or just don’t want your music player to stay open while playing. Huh?

Okay, again: Imagine, you set a machine dedicated for playing music. You put it into a corner, it has no keyboard, just a network interface. How do you proceed? Ah, you install mp3blaster via ssh and let mp3blaster run in the console, right? That’s fine and mp3blaster really kicks ass. But… With mp3blaster you are forced to have a shell account on the machine, just for playing music. Mp3blaster has a lot of features, but it has only one interface and you have to stick to it – and at least you also have to get into the „screen“ business for letting the player run while not being logged in.

So what’s the alternative? Well: Imagine a music player daemon, that keeps your music collection and listens for clients telling him, what to play next. You don’t even need to imagine the music player daemon, just have a look at the „Music Player Daemon“ – abbreviated „mpd“. It’s idea is to completely split user interface and player daemon, enabling you to choose between different user interfaces (from console to gui) and to manage a remote daemon without the need of logging into the machine directly.

Now let’s test it, right away. First, we install „mpd“ by calling „aptitude install mpd“. This will enroll the daemon and start it right away. „mpd“ organises its files in „/var/lib/mpd“ and expects music by default in „/var/lib/mpd/music“. Strange location, isn’t it? While you are free to configure the mpd daemon in /etc/mpd.conf, the easiest way of getting you music into the daemon is to symlink your directory/directories. I keep my music collection in /home/ccm/Music. Therefore I run „sudo ln -s /home/ccm/Music /var/lib/mpd/music/ccm“. Now you have to take a short break and think about access rights: While mpd runs as user „mpd“, which is a good idea, you need to make sure, that your music files are accessible to mpd. I ran into trouble as my mp3 files provided read access only the owner (me). Therefore I needed to decided whether to run mpd as „ccm“, chown my music to „mpd“ or to extend access rights. I decided for last version and just chmod’ed the music files and directories (see below). Now you need to tell mpd that there is new music around. Just run „sudo mpd –create-db“ and it should crawl your library quite fast. So until here we took the following steps:

# install mpd
$ sudo aptitude install mpd
# symlink current music to mpd music library
$ sudo sudo ln -s /home/ccm/Music /var/lib/mpd/music/ccm
# make sure, mpd can access the music
# please be careful with this
$ find /home/ccm/Music -type d -exec chmod 755 '{}' \;
$ find /home/ccm/Music -type f -exec chmod 644 '{}' \;
# tell mpd about the music
$ sudo mpd --create-db

A first graphical approach: Ario

Now let’s listen to some music! But stop: We need a client! Until now we only installed the daemon. An „apt-cache search mpd client“ gives you a brief overview over possible clients. I’d suggest you install „mpc“ (the classic command line tool), „ncmpc“ (an enhanced menu driven client), ario (a gtk client) for now, to see differences. Therefore run „sudo aptitude install mpc ncmpc ario“. Give ario a try if you prefer a gui. Like all clients, ario tries to connect to a mpd instance on the localhost by default. You should already see your music like this:

bildschirmfoto-ario.png

The mpd daemon expects a playlist from you. This is party on the lower side of the interface. Feel free to drag and drop the name of a band/musician, an album or even just a single track into this area and hit play. Hey, mpd play music! But that’s actually like the situation before…

A first console approach: ncmpc

For getting the difference, close the player by clicking on the X on the upper right side. Ario will totally disappear (feel free to check with „ps aux | grep ario“, but the music will continue to play. Nice. Now let’s get it even more abstract and open a console and start „ncmpc“. In this player you can switch to the different „tabs“ by hitting a key from 1 to 5. „2“ is the current playlist, „3“ a file browser. You can hit ENTER on a file in the playlist, and it will play, while DELETE will remove it from the playlist. In the browser, you hit SPACE on a directory and it will be added to the file list or ENTER on a single track. This way you can build a huge playlist very fast.

Let your command line completion work: mpc

With Ario and ncmpc you can already choose between a gui and console interface for controlling your music player. As I really like working on the console, I was happy to see, that the TAB completion from Bash and ZSH support the „mpc“ command, which is the standard console interface. With „mpc“ you will normale use one of the following commands:

# add a directory to the playlist
$ mpc add directory
# add a single track to the playlist
$ mpc add file
# play a track by number from the playlist
$ mpc play NUMBER
# show current playlist
$ mpc playlist
# update the current database as new files have been added
$ mpc update
# list all availabe music
$ mpc listall

If you are a ZSH user like I am, you will be pleased by the heavy TAB completion support. All commands and file names can be completed which actually makes you faster than bothering with any gui. The Bash support is okay, but not that sophisticated. If you don’t know, what I am talking about: never mind. You will, one day :)

Let the browser work: Relaxx

A crazy Ajax guru here from Berlin wrote „Relaxx“, a nice web interface to mpd. Check out the project page for screenshots and the sourceforge page for downloads:

relaxx-light.png

I think this is enough for a first insight into „mpd“ and its clients. If you like the idea, you should read about connecting to remote mpd instances, so you are able to use your local client for a daemon running on a different machine, enabling authentication in mpd or maybe think about running mpd just on your local machine as it is a nice way of keeping your music collecting while being able to choose a client depending on the situation you are in. The mpd wiki is a great place to start gathering further information. You’ll find that a lot of utilities are available – from pidgin plugin for showing the music you are listening to a gnome panel applet. Always have in mind, how strong you are while being on the console as you can even use pipes when using mpc… Have fun.