Howto setup a KVM server the fast way

This is a very short quick setup on how to get KVM server up and running. It assumes that

  • you want to run a KVM server with at least one virtual machine,
  • your KVM server gets an ip address in your network,
  • your virtual machine(s) get an ip address from your network – so you can use bridging instead of natting (using NATting instead of bridging is an easy task but not part of this howto),
  • you can use lvm for disk space allocation on your KVM master (using other disk space allications methods like image files is easy, too, but not part of this howto)

Get the server running

I assume you are able to install an Ubuntu server from scratch and setup a lvm environment. Actually this can be done by mostly accepting the defaults during the Ubuntu server setup. I’d suggest you install at least Ubuntu Lucid 10.04 or newer.
If you continue reading here, you should have a running, up-to-date Ubuntu server with network connectivity and preferably access via ssh.

Get the network up and running

For the bridged network you need to install the bridge utilities and change your network configuration. First install the package:
$ sudo apt-get install bridge-utils
Now add a bridge named „br0“ (this has only be done once):
$ sudo brctl addbr br0
Now change your /etc/network/interfaces so it uses the bridge br0. This step actually sets up br0 instead of eth0. Think of eth0 as being just a physical transport added to the virtual bridge interface.
# The loopback network interface
auto lo
iface lo inet loopback
 
auto eth0
iface eth0 inet manual
 
auto br0
iface br0 inet static
address 192.168.1.100
netmask 255.255.255.0
network 192.168.1.0
broadcast 192.168.1.255
gateway 192.168.1.1
bridge_ports eth0
bridge_fd 9
bridge_hello 2
bridge_maxage 12
bridge_stp off

Please make sure you don’t forget setting your „eth0“ to „iface eth0 inet manual“ as shown above. This is needed as you want to prevent eth0 to fetch an address via dhcp but still want it to be there for your bridge as it is the physical layer. After you setup the bridge either restart your network (sudo /etc/init.d/networking restart) or reboot your server. If you are accessing your server already by ssh be warned that a misconfiguration might lock you out.

Install KVM

Now it’s time to install kvm and some usefull helper applications:
$ sudo apt-get install qemu-kvm ubuntu-vm-builder uml-utilities \
  virtinst

That’s all: You already have a kvm server now. Time to…

Install your first virtual machine

We are going to setup a 100Gb logical volume for the guest, download Ubuntu and create a machine with 2Gb of Ram and 4 cores:

# create an empty 100Gb logical volume
sudo lvcreate --size 100G vg0 --name guest1
# download Ubuntu iso
$ wget http://..../
# create machine
$ sudo virt-install --connect qemu:///system -n guest1 -r 2048 \
 --vcpus=4 -f /dev/mapper/guest1 --network=bridge:br0 \
 --vnc --accelerate -v -c ./SOMEUBUNTUISO.iso \
 --os-type=linux --os-variant=ubuntuKarmic --noautoconsole
# please note: "ubuntuKarmic" is currently the most recent
# virt-install defaults scheme - just use this if in doubt.

Get a VNC connection

KVM uses VNC to give you ca graphical interface to your machine. The good thing about this is, that it enables you to use graphical installers (and yes, even Windows) without problems. As even Ubuntu server boots into a graphical mode in the beginning – it’s great to use VNC here.

I assume you are working on a remote server. KVM gives every guest it launches a new vnc instance with a new, incremented port. It starts with 5900. So let’s tunnel via ssh:

ssh user@remotekvmhost -L 5900:localhost:5900

You connect to your remote kvm host via ssh and open a ssh tunnel fort port 5900. Now start your prefered VNC client locally and let it connect to either display „0“ or port 5900 which means the same in VNC (duh…).

From now on you should see your server on a VNC display. Install it like you’d install every other server. The networking is bridged, so you could even use dhcp if that is offered in your network.

Please make sure, you install the package „acpi“ inside your kvm guest, otherwise you won’t be able to stop the guest from the master (as it is done via acpi):

# make sure, "acpi" is installed in the *guest* machine
sudo apt-get install acpi

After installation you can manage your kvm gues by using the following commands:

# list running instances
$ virsh list
# start an instance
$ virsh start INSTANCENAME
# stop an instance politely
$ virsh stop INSTANCE
# immediatly destroy a running instance
$ virsh destroy INSTANCE
# edit the config file for an instance
$ virsh edit INSTANCE

Mounting the LVM volumes

As you might have noticed, your virtual guest’s lvm volumes cannot be mounted directly in the master as they contain their own partition table. If you need access to the guest’s filesystem from the master, though, you have to create some device nodes. There is a great tool called „kpartx“ than can create and delete device nodes for you. It’s as easy as this:

# install kpartx
$ sudo install kpartx
# make sure, virtual gues is switched off!
# create device nodes
$ sudo kpartx -a /dev/mapper/guest1
# check /dev/mapper for new device nodes and mount/unmount them
# after you are done, delete the nodes
$ sudo kpartx -d /dev/mapper/guest1

Please note, this methods also works with other block devices like image files containing partition tables. You only might run into trouble, when your lvm volume contains it’s own lvm. If that is the case, play around with pvscan, vgscan and lvscan after using kpartx. Be brave but be warned that backing up data is always a great idea.

Alternative Management Interfaces

In case you really need a gui for your management needs, check „virt-manager“. You can install this on your desktop and remotely manage running instances:

$ sudo install virt-manager

You should check RedHat’s „Virtual Machine Manager“ page, though. It might be a good idea to manually compile and install a more recent version and rely on the setup howtos. Personally I prefer using plain text console here, as it helps being able to act quite fast and from everywhere when problems occur.

Conclusion

Nowadays it’s fairly easy setting up a KVM server. As KVM/libvirt enabled guests are quite fast, it’s a nice and easy way for even hosting virtual machines. I run about a dozen virtual machines and three hardware servers for two years now without any serious problems.

Using backuppc as a dirty distributed shell

Backuppc is a neat server-based backup solution. In Linux envorinments it is often used in combination with rsync over ssh – and, let’s be hontest – often fairly lazy sudo or root rights for the rsync over ssh connection. This has a lot of disadvantages, but at least, you can use this setup as a cheap distributed shell, as a good maintained backuppc server might have access to a lot of your servers.

I wrote a small wrapper, that reads the (especially Debian/Ubuntu packaged) backuppc configuration and iterates through the hosts, allowing you to issue commands on every valid connection. I used it so far for listing used ssh keys, os patch levels and even small system manipulations.

1
2
3
4
5
6
7
8
9
10
11
12
13
14
#!/bin/bash
SSH_KEY="-i /var/lib/backuppc/.ssh/id_rsa"
SSH_LOGINS=( `grep "root" /etc/backuppc/hosts | \
 awk '{print "root@"$1" "}' | \
 sed ':a;N;$!ba;s/\n//g'` )
 
for SSH_LOGIN in "${SSH_LOGINS[@]}"
do
 HOST=`echo "${SSH_LOGIN}" | awk -F"@" '{print $2'}`
 echo "--------------------------------------------"
 echo "checking host: ${HOST}"
 ssh -C -qq -o "NumberOfPasswordPrompts=0" \
 -o "PasswordAuthentication=no" ${SSH_KEY} ${SSH_LOGIN} "$1"
done

You can easily change this to your needs (e.g. changing login user, adding sudo and so on).

$ ./exec_remote_command.sh "date"
--------------------------------------------
checking host: a.b.com
Mo 9. Mai 15:40:26 CEST 2011
--------------------------------------------
checking host: b.b.com
[...]

Make sure to quote your command, especially when using commands with options, so the script can handle the command line as one argument.

A younger sister of the script is the following ssh key checker that lists and sorts the ssh keys used on systems by their key comment (feel free to include the key itself):

1
2
3
4
5
6
7
8
9
10
11
12
13
14
15
16
17
18
19
20
21
22
#!/bin/bash
 
SSH_KEY="-i /var/lib/backuppc/.ssh/id_rsa"
SSH_LOGINS=( `grep "root" /etc/backuppc/hosts | \
 awk '{print "root@"$1" "}' | \
 sed ':a;N;$!ba;s/\n//g'` )
 
for SSH_LOGIN in "${SSH_LOGINS[@]}"
do
 HOST=`echo "${SSH_LOGIN}" | awk -F"@" '{print $2'}`
 echo "--------------------------------------------"
 echo "checking host: ${HOST}"
 ssh -C -qq -o "NumberOfPasswordPrompts=0" \
 -o "PasswordAuthentication=no" ${SSH_KEY} ${SSH_LOGIN} \
 "cut -d: -f6 /etc/passwd | xargs -i{} egrep -s \
 '^ssh-' {}/.ssh/authorized_keys {}/.ssh/authorized_keys2" | \
 cut -f 3- -d " " | sort
 ssh -C -qq -o "NumberOfPasswordPrompts=0" \
 -o "PasswordAuthentication=no" ${SSH_KEY} ${SSH_LOGIN} \
 "egrep -s '^ssh-' /etc/skel/.ssh/authorized_keys \
 /etc/skel/.ssh/authorized_keys2" | cut -f 3- -d " " | sort
done

A sample output of the script:

$ ./check_keys.sh 2>/dev/null
--------------------------------------------
checking host: a.b.com
[email protected] 
backuppc@localhost
some random key comment
--------------------------------------------
checking host: b.b.com
[...]

That’s all for now. Don’t blame me for doing it this way – I am only the messenger :)

sync ruby gems between different installed ruby versions

If you are in the Ruby business (which probably means „in the Ruby on Rails business“ nowadays) sooner or later you’ll have to play around with different Ruby versions on the same machine as you might run into crashing ruby processes or performance issues . At least you’ll notice that running the standard Debian/Ubuntu Ruby versions might get you into serious trouble as it is several times slower than a manually compiled version (for reference see this launchpad bug and this blog entry.).

So a common situation with is: you have Ruby and a lot of Ruby gems installed and need to switch to a different Ruby version while making sure that you have all gems installed in the new version that you had in the old version. As gems differ from version to version you should also be interested in installing exactly the same gem versions again and not justing doing a install of all recent versions.

As far as I know there is no official way of syncing gems between two ruby installations. So the common way is something like asking ruby for a list of currently installed gems like

$ gem list
 
*** LOCAL GEMS ***
 
actionmailer (2.3.2, 2.2.2, 2.1.1)
actionpack (2.3.2, 2.2.2, 2.1.1)
activerecord (2.3.2, 2.2.2, 2.1.1)
activeresource (2.3.2, 2.2.2, 2.1.1)
activesupport (2.3.2, 2.2.2, 2.1.1)
[...]
ZenTest (4.0.0)

and then running a

$ gem install actionmailer -v 2.3.2
$ gem install actionmailer -v 2.2.2
$ gem install actionmailer -v 2.1.1
[...]
$ gem install Zentest -v 4.0.0

for every gem and every gem version you probably need. As a couple of gems are native extensions they’ll get compiled and you need to wait some seconds or minutes.

As I had to do this task more than once I wrote a small wrapper script that automates the process completely by fetching the list of gems and installing them again on another ruby version:

#!/bin/sh
GEM_FROM=/path/to/old/gem
GEM_TO=/path/to/new/gem
${GEM_FROM} list | sed -n '4,$ p' | \
 while read gem versions; do
  for version in $(echo ${versions} | sed "s/[(),]//g"); do
  echo ${gem} ${version}
  ${GEM_TO} install --no-rdoc --no-ri ${gem} -v ${version}
 done
done

The script uses some regular expression sed magic, friendly tweaked by Mnemonikk (thank you). Please note, that I prefer not to install rdoc and ri, as it saves time and disk space. Feel free to change this to your needs.

The only caveeat in this script are gems that cannot be installed as they come from unknown external repositories or were manually downloaded/installed. Therefore try to make sure to check this after a run of the gem sync script – it won’t stop when a gem cannot be installed which is intended behaviour.

So far about this. Hope, it helps you out when dealing with different Ruby versions. Do you have similar best practices for keeping Ruby gems in sync?

A quick note on MySQL troubleshooting and MySQL replication

PLEASE NOTE: I am currently reviewing and extending this document.

While caring for a remarkable amount of MySQL server instances, troubleshooting becomes a common task. It might of interest for you which

Recovering a crashed MySQL server

After a server crash (meaning the system itself or just the MySQL daemon) corrupted table files are quite common. You’ll see this when checking the /var/log/syslog, as the MySQL daemon checks tables during its startup.

Apr 17 13:54:44 live1 mysqld[2613]: 090417 13:54:44 [ERROR]
  /usr/sbin/mysqld: Table './database1/table1' is marked as
  crashed and should be repaired

The MySQL daemon just told you that it found a broken MyISAM table. Now it’s up to you fixing it. You might already know, that there is the „REPAIR“ statement. So a lot of people enter their PhpMyAdmin afterwards, select database and table(s) and run the REPAIR statements. The problem with this is that in most cases your system is already in production – for instance is up again and the MySQL server already serves a bunch of requests. Therefore a REPAIR request gets slowed down dramatically. Consider taking your website down for the REPAIR – it will be faster and it’s definitely smarter not to deliver web pages based on corrupted tables.

The other disadvantage of the above method is, that you probably just shut down your web server and your PhpMyAdmin is down either or you have dozens of databases and tables and therefore it’s just a hard task to cycle through them. The better choice is the command line in this case.

If you only have a small number of corrupted tables, you can use the „mysql“ client utility doing something like:

$ mysql -u root -p
Enter password:
Welcome to the MySQL monitor.  Commands end with ; or \g.
Your MySQL connection id is 10
Server version: 5.0.75-0ubuntu10 (Ubuntu)

Type 'help;' or '\h' for help. Type '\c' to clear the buffer.

mysql> REPAIR TABLE database1.table1;
+--------------------+--------+----------+----------+
| Table              | Op     | Msg_type | Msg_text |
+--------------------+--------+----------+----------+
| database1.table1   | repair | status   | OK       |
+--------------------+--------+----------+----------+
1 row in set (2.10 sec)

This works, but there is a better way: First, using OPTIMIZE in combination with REPAIR is suggested and there is a command line tool only for REPAIR jobs. Consider this call:

$ mysqlcheck -u root -p --auto-repair --check --optimize database1
Enter password:
database1.table1      OK
database1.table2      Table is already up to date

As you see, MySQL just checked the whole database and tried to repair and optimize it.

The great deal about using „mysqlcheck“ is, that it can also be run against all databases in one run without the need of getting a list of them in advance:

$ mysqlcheck -u root -p --auto-repair --check --optimize \
  --all-databases

Of course you need to consider if an optimize of all your databases and tables might just take too long if you have huge tables. On the other hand a complete run prevents of thinking about a probably missed table.

[update]

nobse pointed out in the comments, that it’s worth having a look at the automatic MyIsam repair options in MySQL. So have a look at them if you want to automate recovery:

option_mysqld_myisam-recover

Recovering a broken replication

MySQL replication is an easy method of load balancing database queries to multiple servers or just continuously backing up data. Though it is not hard to setup, troubleshooting it might be a hard task. A common reason for a broken replication is a server crash – the replication partner notices that there are broken queries – or even worse: the MySQL slave just guesses there is an error though there is none. I just ran into the latter one as a developer executed a „DROP VIEW“ on a non-existing VIEW on the master. The master justs returns an error and ignores. But as this query got replicated to the MySQL SLAVE, the slave thinks it cannot enroll a query and immediately stopped replication. This is just an example of a possible error (and a hint on using „IF EXISTS“ as often as possible).

Actually all you want to do now, is telling the slave to ignore just one query. All you need to do for this is stopping the slave, telling it to skip one query and starting the slave again:

$ mysql -u root -p
mysql> STOP SLAVE;
mysql> SET GLOBAL SQL_SLAVE_SKIP_COUNTER = 1;
mysql> START SLAVE;

That’s all about this.

Recreating databases and tables the right way

In the next topic you’ll recreate databases. A common mistake when dropping and recreating tables and databases is forgetting about all the settings it had – especially charsets which can run you into trouble later on („Why do all these umlauts show up scrambled?“). The best way of recreating tables and databases or creating them on other systems therefore is using the „SHOW CREATE“ statement. You can use „SHOW CREATE DATABASE database1“ or „SHOW CREATE TABLE database1.table1“ providing you with a CREATE statement with all current settings applied.

mysql> show create database database1;
+-----------+--------------------------------------------------------------------+
| Database  | Create Database                                                    |
+-----------+--------------------------------------------------------------------+
| database1 | CREATE DATABASE `database1` /*!40100 DEFAULT CHARACTER SET utf8 */ |
+-----------+--------------------------------------------------------------------+
1 row in set (0.00 sec)

The important part in this case is the „comment“ after the actual create statement. It is executed only on compatible MySQL server versions and makes sure, your are running utf8 on the database.

Keep this in mind and it might save you a lot of trouble.

Fixing replication when master binlog is broken

When your MySQL master crashes there is a slight chance that your master binlog gets corrupted. This means that the slaves won’t receive updates anymore stating:

[ERROR] Slave: Could not parse relay log event entry. The possible reasons are: the master’s binary log is corrupted (you can check this by running ‚mysqlbinlog‘ on the binary log), the slave’s relay log is corrupted (you can check this by running ‚mysqlbinlog‘ on the relay log), a network problem, or a bug in the master’s or slave’s MySQL code. If you want to check the master’s binary log or slave’s relay log, you will be able to know their names by issuing ‚SHOW SLAVE STATUS‘ on this slave. Error_code: 0

You might have luck when only the slave’s relay log is corrupted as you can fix this with the steps mentioned above. But a corrupted binlog on the master might not be fixable though the databases itself can be fixed. Depending on your time you try to use the „SQL_SLAVE_SKIP_COUNTER“ from above but actually the only way is to setup

Setting up replication from scratch

There are circumstances forcing you to start replication from scratch. For instance you have a server going live for the first time and actually all those test imports don’t need to be replicated to the slave anymore as this might last hours. My quick note for this (consider backing up your master database before!)

slave: STOP SLAVE;
slave: RESET SLAVE;
slave: SHOW CREATE DATABASE datenbank;
slave: DROP DATABASE datenbank;
slave: CREATE DATABASE datenbank;

master: DROP DATABASE datenbak;
master: SHOW CREATE DATABASE datenbank;
master: CREATE DATABASE datenbank;
master: RESET MASTER

slave: CHANGE MASTER TO MASTER_USER="slave-user", \
MASTER_PASSWORD="slave-password", MASTER_HOST="master.host";
slave: START SLAVE

You just started replication from scratch, check „SHOW SLAVE STATUS“ on the slave and „SHOW MASTER STATUS“ on the master.

Deleting unneeded binlog files

Replication needs binlog files – a mysql file format for storing database changes in a binary format. Sometimes it is hard to decide how many of the binlog files you want to keep on the server possibly getting you into disk space trouble. Therefore deleting binlog files that have already been transferred to the client might be a smart idea when running low on space.

First you need to know which binlog files the slave already fetched. You can do this by having a look on „SHOW SLAVE STATUS;“ on the slave. Now log into the MySQL master and run something like:

mysql> PURGE BINARY LOGS TO 'mysql-bin.010';

You can even do this on a date format level:

mysql> PURGE BINARY LOGS BEFORE '2008-04-02 22:46:26';

Conclusion

The above hints might save you same time when recovering or troubleshooting a MySQL server. Please note, that these are hints and you have – at any time – make sure, that your data has an up to date backup. Nothing will help you more.

Having fun with OpenSSH on Ubuntu Intrepid Ibex – visual host keys

After having a quite uneventful upgrade to Ubuntu Intrepid Ibex (time for a change), I’s happy to notice, that Intrepid Ibex ships the new OpenSSH version 5.1 which has one little feature, I really fell in love with: visual host keys. You might already have read about it on Planet Ubuntu. In case you don’t: „visual host keys“ is a way presenting the ssh client user a 2d ascii art visualation of the host key fingerprint. It shall help you to recognize a ssh server by remembering a figure rather than the host key.

If you want to give this a try, call the ssh client this way:

$ ssh -o VisualHostKey=yes your.host.name
Host key fingerprint is ff:aa:a8:dc:0b:5e:e3:9f:96:f1:75:d4:24
+--[ RSA 1024]----+
|            +o   |
|             o. .|
|            E  + |
|       .   . .. .|
|      . S   ..   |
|   . o o..  . .  |
|    + + .+.. .   |
|   . + ooo.      |
|    . ooo        |
+-----------------+

Nice, isn’t it? Now try your different ssh hosts and compare the figures. Hope you don’t start generating ssh host keys for getting a special figure, do you? :) Actually I don’t know if I’ll really remember figures of dozens of machines, but hey: it’s just additional fun.

In case you want to make this behavior default, add „VisualHostKey yes“ to your „~/.ssh/config“. In case you don’t have this file, make a new one with the following content (and find out that this file makes ssh really poweful in combination with command line completion, but that is another topic):

Host *
	VisualHostKey		yes

Please note: This might break applications that rely on the ssh console client as they don’t expect graphical art popping up. So if some other clients don’t work anymore, play around with aliases or your ~/ssh/config file.

Thank you, OpenSSH guys, I really appreciate your work.

My (unofficial) package of the day: 3ware-cli and 3dms for monitoring 3ware raid controllers

Having a real hardware raid controller is a nice thing: Especially in a server setup it helps you keeping data safe on multiple disks. Though, a common mistake is, having a raid controller and not monitoring it. Why? Let’s say, you have a simple type 1 array (one disk mirrored to another) and one of the disks fails. If your raid systems works it will continue to work. But if you did not setup a monitoring for it, you won’t notice it and the chance of a total data loss increases as you are running on one disk now.

So monitoring a raid is actually the step that makes your raid system as safe as you wanted it when setting it up. Some raids are quite easy to monitor, like a Linux software raid system. Some need special software. As I recently got a bunch of dedicated (Hetzner DS8000 and other) servers with 3ware raid controllers, I checked the common software repositories for monitoring software and was surprised not finding any suitable. So a web research showed me that there are Linux tools from 3ware. Of course they don’t provide .deb packages so you need to take of this yourself if you don’t want to install the software manually.

But there exists an unofficial Debian repository by Jonas Genannt (thank you!), providing recent packages of 3ware utilities under http://jonas.genannt.name/. Check the repository, it offers 3ware-3dms and 3ware-cli. 3ware-3dms is a web application for managing your raid controller via browser, BUT: think twice, if you want this. The application opens a privileged port (888) as it is not able to bind on the local interface and has a crappy user identification system. As I am not a friend of opening ports and closing them afterwards via firewall I dropped the web solution.

The „3ware-cli“ utility is just a command line interface to 3ware controllers. Just grab a .deb from the repository above and install it via „dpkg -i xxx.deb“. Aftwerwards you stark asking your controller questions about it’s status. The command is called „tw_cli“, so let’s give it a try with „info“ as parameter:

# tw_cli info
Ctl   Model        (V)Ports  Drives   Units   NotOpt  RRate   VRate  BBU
------------------------------------------------------------------------
c0    8006-2LP     2         2        1       0       2       -      -

tw_cli told us, that there is one controller (meaning a real piece of raid hardware) called „c0“ with two drives. No we want more detailed information about the given controller:

# tw_cli info c0
 
Unit  UnitType  Status         %RCmpl  %V/I/M  Stripe  Size(GB)  Cache  AVrfy
------------------------------------------------------------------------------
u0    RAID-1    OK             -       -       -       232.885   ON     -      
 
Port   Status           Unit   Size        Blocks        Serial
---------------------------------------------------------------
p0     OK               u0     232.88 GB   488397168     6RYBP4R9
p1     OK               u0     232.88 GB   488397168     6RYBSHJC

tw_cli reports that controller c0 has one unit „u0“. A unit is the device that your operating system is working with – the „virtual“ raid drive provided by the raid controller. There are two ports/drives in this unit, called „p0“ and „p1“. Both of them have „OK“ as status message meaning that the drives are running fine.

You also ask a drive directly by asking tw_cli for the port on the controller:

# tw_cli info c0 p0

Port   Status           Unit   Size        Blocks        Serial
---------------------------------------------------------------
p0     OK               u0     232.88 GB   488397168     6RYBP4R9            

# tw_cli info c0 p1

Port   Status           Unit   Size        Blocks        Serial
---------------------------------------------------------------
p1     OK               u0     232.88 GB   488397168     6RYBSHJC

So you might already got the clue: As tw_cli is just a command line tool your task for an automated setup is setting up a cronjob checking the status of the ports (not the unit! the ports – trust me) regularly and sending a mail or nagios alarm when necessary. I just started writing a little shell script which, right now, just returns an exit status – 0 for a working raid and 1 for a problem:

#!/bin/bash
 
UNIT=u0
CONTROLLER=c0
PORTS=( p0 p1 )
 
tw_check() {
  local regex=${1:-${UNIT}}
  local field=3
  if [ $# -gt 0 ]; then
    field=2
  fi
  local check=$(tw_cli info ${CONTROLLER} $1 \
    | awk "/^$regex/ { print \${field} }")
  [ "XOK" = "X${check}" ]
  return $?
}
 
tw_check || exit 1
for PORT in ${PORTS[@]}; do
tw_check ${PORT} || exit 1
done

As you see you can configure unit, controller and ports. I have not checked this against systems with multiple controllers and units as I don’t have such a setup. But if you need you could just put the configuration stuff in a sourced configuration file.

After writing this little summary I checked all servers I am responsible of and noticed that nearly every server with hardware raid has a 3ware controller and can be checked with tw_cli. Fine…

Let me know how you manage your 3ware raid monitoring under GNU/Linux and Debian/Ubuntu based systems.

my package of the day – htmldoc – for converting html to pdf on the fly

PDF creation got actually fairly easy. OpenOffice.org, the Cups printing system, KDE provide methods for easily printing nearly everything to a PDF file right away. A feature that even outperforms most Windows setups today. But there are still PDF related task that are not that simple. One I often run into is automated PDF creation on a web server. Let’s say you write a web application and want to create PDF invoices on the fly.

There are, of course, PDF frameworks available. Let’s take PHP as an example: If you want to create a PDF from a php script, you can choose between FPDF, Dompdf, the sophisticated Zend Framework and more (and commercial solutions). But to be honest, they are all either complicated (as you often have to use a specific syntax) to use or just quite limited in their possibilities to create a pdf file (as you can only use few design features). As I needed a simple solution for creating a 50+ pages pdf file with a huge table on the fly I tested most frameworks and failed with most of them (often just as I did not have enough time to write dozens of line of code).

So I hoped to find a solution that allowed me just to convert a simple HTML file to a PDF file on the fly providing better compatibility than Dompdf for instance. The solution was … uncommon. It was no PHP class but a neat command line tool called „htmldoc“ available as a package. If you want to give it a try just install it by calling „aptitude install htmldoc“.

You can test htmldoc by saving some html files to disk and call „htmldoc –webpage filename.html“. There a lot of interesting features like setting font size, font type, the footer, color and greyscale mode and so on. But let’s use htmldoc from PHP right away. The following very simple script uses the PHP output buffer for minimizing the need for a write to disk to one file only (if somebody knows a way of using this without any temporary files from a script, let me know):

// start output buffer for pdf capture
 
ob_start();
?>
your normal html output will be places here either by
dumping html directly or by using normal php code
<?php
// save output buffer
$html=ob_get_contents();
// delete Output-Buffer
ob_end_clean();
// write the html to a file
$filename = './tmp.html';
if (!$handle = fopen($filename, 'w')) {
	print "Could not open $filename";
	exit;
}
if (!fwrite($handle, $html)) {
	print "Could not write $filename";
	exit;
}
fclose($handle);
// htmldoc call
$passthru = 'htmldoc --quiet --gray --textfont helvetica \
--bodyfont helvetica --logoimage banner.png --headfootsize 10 \
--footer D/l --fontsize 9 --size 297x210mm -t pdf14 \
--webpage '.$filename;
 
// write output of htmldoc to clean output buffer
ob_start();
passthru($passthru);
$pdf=ob_get_contents();
ob_end_clean();
 
// deliver pdf file as download
header("Content-type: application/pdf");
header("Content-Disposition: attachment; filename=test.pdf");
header('Content-length: ' . strlen($pdf));
echo $pdf;

As you can see, this is neither rocket science nor magic. Just a wrapper for htmldoc enabling you to forget about the pdf when writing the actual content of the html file. You’ll have to check how htmldoc handles your html code. You should make it as simple as possible, forget about advanced css or nested tables. But it’s actually enough for a really neat pdf file and it’s fast: The creating of 50+ page pdf files is fast enough in my case to make the on demand access of htmldoc feel like static file usage.

Please note: Calling external programs and command line tools from a web script is always a security issue and you should carefully check input and updates for the program you are using. The code provided should be easily ported to another web language/framework like Perl and Rails.

my package of the day – mtr as a powerful and default alternative to traceroute

Know the situation? Something is wrong with the network or you are just curious and want to run a „traceroute“. At least under most Debian based systems your first session will probably look like this:

$ traceroute www.ubuntu.com
command not found: traceroute

Maybe on Ubuntu you will at least be hinted to install „traceroute“ or „traceroute-nanog“… To be honest, I really hate this lack of a basic tool and cannot even remember how often I typed „aptitude install traceroute“ afterwards (and press thumbs your network is up and running).

But sometimes you just need to dig a bit deeper and this time the surprise was really big as the incredible Mnemonikk told me about an alternative that is installed by default in Ubuntu and nearly no one knows about it: „mtr„, which is an abbreviation for „my traceroute“.

Let’s just check it by calling „mtr www.ubuntu.com“ (i slightly changed the output for security reasons):

                 My traceroute  [v0.72]
ccm        (0.0.0.0)          Wed Jun 20 6:51:20 2008
Keys:  Help   Display mode   Restart statistics   Order
of fields      Packets               Pings
 Host        Loss%   Snt   Last   Avg  Best  Wrst StDev
 1. 1.2.3.4   0.0%   331    0.3   0.3   0.3   0.5   0.0
 2. 2.3.4.5   0.0%   331   15.6  16.3  14.9  42.6   2.6
 3. 3.4.5.6   0.0%   330   15.0  15.5  14.4  58.5   2.7
 4. 4.5.6.7   0.0%   330   17.5  17.3  15.4  60.5   5.3
 5. 5.6.7.8   0.0%   330   15.7  24.3  15.6 212.3  30.2
 6. ae-32-52 58.8%   330   20.6  22.1  15.9  42.5   4.7
 7. ae-2.ebr 54.1%   330   20.6  25.0  19.0  45.4   4.7
 8. ae-1-100  0.0%   330   21.5  25.4  19.2  41.1   5.1
 9. ae-2.ebr  0.0%   330   27.5  34.0  26.7  73.5   5.2
10. ae-1-100  0.3%   330   28.8  33.6  26.7  72.5   6.0
11. ae-2.ebr  0.0%   330   30.8  32.9  26.7  48.5   5.0
12. ae-26-52  0.0%   330   27.6  34.8  26.9 226.8  26.8
13. 195.50.1  0.3%   330   27.7  28.4  27.2  42.5   1.7
14. gw0-0-gr  0.0%   330   27.9  28.1  27.0  40.5   1.4
15. avocado.  0.0%   330   27.8  28.0  27.2  36.2   1.0

You might notice, that the output is quite well formed („mtr“ uses curses for this). The interesting point is: Instead of running once, mtr continuously updates the output and statistics, providing you with a neat network overview. So you can use it as an enhanced ping showing all steps between you and the target.

For the sake of it: The package installed by default in Ubuntu is actually called „mtr-tiny“ as it lacks a graphical user interface. If you prefer a gui you can replace the package with „mtr“ by running „aptitude install mtr“. When running „mtr“ from the console afterwards you will be prompted with a gtk interface. In case you still want text mode, just append „–curses“ as a parameter.

Yes, that was a quick package, but if you keep it in mind, you will save time, you normalle spend for installing „traceroute“ and you’ll definitely have better results for network diagnose. Happy mtr’ing!

[update]

sherman noted, that the reason for traceroute not being installed is, that it’s just deprecated and „tracepath“ should be used instead. Thank you for the hint, though I’d prefer „mtr“ as it’s much more reliable and verbose.

my package of the day – gpg for symmetric encryption

Though asymmetric encryption is state of the art today, there are still cases when you probably are in need of a simple symmetric encryption. In my case, I need an easy scriptable interface for encrypting files for backup as transparent as possible. While you can, of course, use asymmetric encryption for this, symmetric methods can save you a lot of time while still being secure enough.

So there are methods like stupid .zip encryption or a bunch of packages in the repositories like „bcrypt“ that provide you with their implementations. But there is a tool, you already know and maybe even use, but don’t think of when considering symmetric encryption: „gpg„. Actually gpg heavily relies on symmetric algorithms as you might know. The public/private key encryption is a combination of asymmetric and symmetric encryption as the latter is quite more cpu efficient. In our case, gpg will use the strong cast5 cipher by default.

Encrypting

So as gpg already knows about a bunch of symmetric encryption algorithms, why not use them? Let’s just see an example. You have a file named „secretfile1.txt“ and want to encrypt it:

$ gpg --symmetric secretfile1.txt

You will be prompted for a password. Afterwards you’ll have a file named secretfile1.txt.gpg. You are already done! Please note: The file size of the encrypted file might have decreased as gpg also compresses during encryption and outputs a binary. In my test case the file size went down from 700k to 100k. Nice.

Armoring

In case you need to have an easy portable file that is even ready to be copy-pasted, you can ask gpg to create an ascii armor container:

$ gpg --armor --symmetric secretfile1.txt

The output file will be called „secretfile1.txt.asc“. Don’t bother to open it in a text editor of your choice. The beginning will look similar to this:

$ head secretfile1.txt.asc
-----BEGIN PGP MESSAGE-----
Version: GnuPG v1.4.6 (GNU/Linux)

jA0EAwMChpQrAA/o8IFgye1j3ErZPvXumcnIwbzSvENDD/fYlWMRiY/qqvn949kV
+mo/v+nQi7OFrrA45scQPuPbj8I1T+2f7XAT4ouW2kuHIJ/2zkyrxBMvO04fDH82
273NwUrXd/s+JJXe+wJz149K324rE7+FIHvfImiez8lRs5qyRI/drp/wFK8ZHRvF
gzhDGaTe8Dgj1YqHgWAY4eAjrXhYLI1imbIYrV1OVPia6Roif37FV7C1AT/i/2HX
2ytI2mBhQLdqkSVeqXZ74lgZhsitnOeqZH65IuTLi77PUcroFOuefw6+4qSpMIuM
8dyi4jCqQ1jCR7PRorpGvm3RtXhlkB689vrknKmOa5uztTj3MGrPOgC6jegBpu/L
3419sAxRtw8bj2lP76B+XXPZ2Tuzpg01hC/BWlifSexy+juYXv7iuF5BuQ1z7nTi

(In this case I used ‚head“ for displaying the first ten lines. Head is similar to tail, which you might already know.) Though the ascii file is larger than the binary .gpg file it is still much smaller than the original text file (about 200k in the above case). When tampering with binary files like already compressed tarballs the file size of the encrypted file might slightly increase. In my test, the size grew from a 478kB file to a 479kB file when using binary mode. In ascii armor mode the size nearly hit the 650kb mark, which is still pretty acceptable.

Decrypting

Decrypting is as easy. Just call „gpg –decrypt“, for instance:

$ gpg --decrypt secretfile1.txt.gpg
# or
$ gpg --decrypt secretfile1.txt.asc

gpg knows by itself, if it is given an ascii armored or binary file. But nevertheless the output will be written to standard output, so the following line might be much more helpful for you:

$ gpg --output secretfile1.txt --decrypt secretfile1.txt.gpg

Please note, that you need to stick to the order first –output, then –decrypt. Of course you can also use a redirector („>“).

Piping

So, for the sake of it: The real interesting thing is that you can use gpg symmetric encryption in a chain of programs, controlled by pipes. This enables you to encrypt/decrypt on the fly with shell scripts helping you to write strong backup scripts. Gpg already detects, if your are using it in a pipe. So let’s try it out:

$ tar c directory | gpg --symmetric --passphrase secretmantra \
| ssh hostname "cat &gt; backup.tar.gpg"

We just made a tarbal, encrypted it and sent it over ssh without creating temporary files. Nice, isn’t it? To be honest, piping over ssh is not a big deal anymore. But piping to ftp? Check this:

$  tar c directory | gpg --symmetric --passphrase SECRETMANTRA \
| curl --netrc-optional --silent --show-error --upload-file - \
--ftp-create-dirs ftp://USER:PASSWORD@SECRETHOST/SECRETFILE.tar.gpg

With the mighty curl we just piped from tar over gpg directly to a file on a ftp server without any temporary files. You might get a clue of the power of this chain. Now you can start using a dumb ftp server as encrypted backup device now completely transparently.

That’s all for now. If you like encryption, you should also check symmetric encryption and the possibilities of enhancing daily business scripts security by adding some strong crypto to it. Of course you can complain about the security of the password, the possible visibility via „ps aux“, but you should be able to reduce risks by putting some brain in it. In the meantime check „bashup„, the bash backup script, which uses methods described here to provide you with a powerful and scriptable backup library written in Bash with minimum depencies. And yes, gpg will be added soon.

my package of the day – sash – the Stand Alone SHell for system recovery

Let me introduce you today to a package that is quite unknown as you hopefully never need it. But when you need it and have not thought about it before, it is probably already too late. I am talking about „sash“ – the „Stand Alone SHell“. Yet another shell? Yes and no. Yes it is a shell, but no, I am not trying to show something like the shiny friendly interactive shell or (my favorite) „zsh“. Quite the contrary: You can give „sash“ a lot of attributes, but not „shiny“.

So what is about? Imagine the following case: You are running a machine and suddenly something goes totally wrong. Partition errors, missing libraries, you have messed around with libc, whatever. This can get you into serious trouble. You are fine, when you have the possibility to boot a recovery cd or something similar. But under some circumstances you might have to stick to the programs already installed though they seem to be broken. Maybe it is a virtual server somewhere on the web and you are only allowed to boot into a recovery mode giving you a prompt to your server. So you are trying to login as root but it just does not work for some reasons. Broken dependencies. Who knows.

The point is: When you login onto a machine for system recovery, you are already relying on a lot of tools and dependencies – though it only seems to be a shell. The shell might be linked against a couple of libraries, a lot of commands you want to run are not build in and therefore a bunch of external dependencies can bar your way. So what you actually might need in a situation of severe pain is a shell that provides you with as much essential tools as you need on its own without relying on external code.

Installing sash

This is where „sash“ comes into play. Sash is not a dynamic linked executable, it has actually all needed features built in. So as long as you can execute the sash binary, you can have a working shell. Let’s check it! Install „sash“ by using „aptitude install sash“ or you preferred package manager. Please note, that sash will clone your current root account:

cloning root account entry to create sashroot account in /etc/passwd
Cloned sashroot from root in /etc/passwd
cloning root account entry to create sashroot account in /etc/shadow
Cloned sashroot from root in /etc/shadow

So you have this new line in your /etc/passwd:

sashroot:x:0:0:root:/root:/bin/sash

You should consider giving sashroot a password if you want to be able to login with this account. But please check if this applies to your security needs.

See the difference

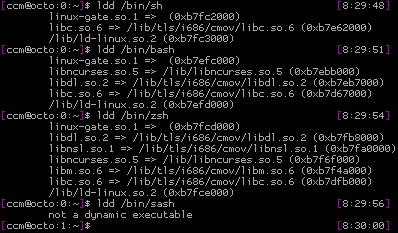
Now let’s check how the sash binary differs from the standard shell, the bash and the zsh. We are using „ldd“ for this, as it is lists libraries, an executable is linked against:

bildschirmfoto-terminal.png

Pretty impressive. All „normal“ shells have at least three dependencies, sash apparently has none.

But getting rid of external libraries is not the only difference sash makes. Another major feature is the collection of built-in commands:

-ar, -chattr, -chgrp, -chmod, -chown, -cmp, -cp,
-dd, -echo, -ed, -grep, -file, -find, -gunzip,
-gzip, -kill, -ln, -ls, -lsattr, -mkdir, -mknod,
-more, -mount, -mv, -printenv, -pwd, -rm, -rmdir,
-sum, -sync, -tar, -touch, -umount, -where

Seems like a list of commands you yearn for, when in recovery mode, don’t you? Note the leading „-“ at the beginning of those commands. This is the way, sash handles your attempts to run internal and external commands. When using „mv“, sash gives you the normal /bin/mv, when using „-mv“, sash provides you with it’s own replacement. But „sash“ helps you when you don’t want to type the „-“ at the beginning of every command. You can enter „aliasall“ in a sash session as it will create non permanent aliases for all builtin commands:

bildschirmfoto-terminal-1.png

Emergency

In case of an emergency you might need to boot directly into sash as maybe your initrd stuff is broken. How? Just append a „init=/bin/sash“ to your kernel command line – be it lilo or grub. This way, you will be directly dropped into a sash session.

What’s missing?

Sadfully one essential command is missing: fsck. As the sash manual points out: fsck is just way too big to be included in a statically linked binary. Sad, but true. But hey: Better being to able at least to act on the console than having no console at all.

Sash as a standard shell?

… is not a good idea. It just lacks a lot of features you’ll really want when working on the command line: A verbose prompt, command history, tab completion and so on.

So it’s to install sash now as you will miss it, when it’s too late :)
(And just if you’d like to ask: Yes, at least once I really needed sash and it helped me to save a lot of time.)