GNU Emacs workshop at c-base / Berlin

Emacs? Emacs! I proudly announce the first Emacs workshop held by the incredible Anselm Helbig (also known as „mnemonikk“), starting next Monday, the 22nd of March at c-base/Berlin/Germany. If you ever wanted to start using Emacs as an advanced editor and development environment, this is the right kick off workshop for you. Anselm is ready to answer all your questions regarding installation, configuration, usage and programming of the GNU Emacs editor. The focus of the workshop is a hands on experience rather than a lecture.

A detailed German description of the workshop can be found in Anselm’s blog. The workshop is free of charge.

my package of the day – mtr as a powerful and default alternative to traceroute

Know the situation? Something is wrong with the network or you are just curious and want to run a „traceroute“. At least under most Debian based systems your first session will probably look like this:

$ traceroute www.ubuntu.com
command not found: traceroute

Maybe on Ubuntu you will at least be hinted to install „traceroute“ or „traceroute-nanog“… To be honest, I really hate this lack of a basic tool and cannot even remember how often I typed „aptitude install traceroute“ afterwards (and press thumbs your network is up and running).

But sometimes you just need to dig a bit deeper and this time the surprise was really big as the incredible Mnemonikk told me about an alternative that is installed by default in Ubuntu and nearly no one knows about it: „mtr„, which is an abbreviation for „my traceroute“.

Let’s just check it by calling „mtr www.ubuntu.com“ (i slightly changed the output for security reasons):

                 My traceroute  [v0.72]
ccm        (0.0.0.0)          Wed Jun 20 6:51:20 2008
Keys:  Help   Display mode   Restart statistics   Order
of fields      Packets               Pings
 Host        Loss%   Snt   Last   Avg  Best  Wrst StDev
 1. 1.2.3.4   0.0%   331    0.3   0.3   0.3   0.5   0.0
 2. 2.3.4.5   0.0%   331   15.6  16.3  14.9  42.6   2.6
 3. 3.4.5.6   0.0%   330   15.0  15.5  14.4  58.5   2.7
 4. 4.5.6.7   0.0%   330   17.5  17.3  15.4  60.5   5.3
 5. 5.6.7.8   0.0%   330   15.7  24.3  15.6 212.3  30.2
 6. ae-32-52 58.8%   330   20.6  22.1  15.9  42.5   4.7
 7. ae-2.ebr 54.1%   330   20.6  25.0  19.0  45.4   4.7
 8. ae-1-100  0.0%   330   21.5  25.4  19.2  41.1   5.1
 9. ae-2.ebr  0.0%   330   27.5  34.0  26.7  73.5   5.2
10. ae-1-100  0.3%   330   28.8  33.6  26.7  72.5   6.0
11. ae-2.ebr  0.0%   330   30.8  32.9  26.7  48.5   5.0
12. ae-26-52  0.0%   330   27.6  34.8  26.9 226.8  26.8
13. 195.50.1  0.3%   330   27.7  28.4  27.2  42.5   1.7
14. gw0-0-gr  0.0%   330   27.9  28.1  27.0  40.5   1.4
15. avocado.  0.0%   330   27.8  28.0  27.2  36.2   1.0

You might notice, that the output is quite well formed („mtr“ uses curses for this). The interesting point is: Instead of running once, mtr continuously updates the output and statistics, providing you with a neat network overview. So you can use it as an enhanced ping showing all steps between you and the target.

For the sake of it: The package installed by default in Ubuntu is actually called „mtr-tiny“ as it lacks a graphical user interface. If you prefer a gui you can replace the package with „mtr“ by running „aptitude install mtr“. When running „mtr“ from the console afterwards you will be prompted with a gtk interface. In case you still want text mode, just append „–curses“ as a parameter.

Yes, that was a quick package, but if you keep it in mind, you will save time, you normalle spend for installing „traceroute“ and you’ll definitely have better results for network diagnose. Happy mtr’ing!

[update]

sherman noted, that the reason for traceroute not being installed is, that it’s just deprecated and „tracepath“ should be used instead. Thank you for the hint, though I’d prefer „mtr“ as it’s much more reliable and verbose.

my package of the day – sash – the Stand Alone SHell for system recovery

Let me introduce you today to a package that is quite unknown as you hopefully never need it. But when you need it and have not thought about it before, it is probably already too late. I am talking about „sash“ – the „Stand Alone SHell“. Yet another shell? Yes and no. Yes it is a shell, but no, I am not trying to show something like the shiny friendly interactive shell or (my favorite) „zsh“. Quite the contrary: You can give „sash“ a lot of attributes, but not „shiny“.

So what is about? Imagine the following case: You are running a machine and suddenly something goes totally wrong. Partition errors, missing libraries, you have messed around with libc, whatever. This can get you into serious trouble. You are fine, when you have the possibility to boot a recovery cd or something similar. But under some circumstances you might have to stick to the programs already installed though they seem to be broken. Maybe it is a virtual server somewhere on the web and you are only allowed to boot into a recovery mode giving you a prompt to your server. So you are trying to login as root but it just does not work for some reasons. Broken dependencies. Who knows.

The point is: When you login onto a machine for system recovery, you are already relying on a lot of tools and dependencies – though it only seems to be a shell. The shell might be linked against a couple of libraries, a lot of commands you want to run are not build in and therefore a bunch of external dependencies can bar your way. So what you actually might need in a situation of severe pain is a shell that provides you with as much essential tools as you need on its own without relying on external code.

Installing sash

This is where „sash“ comes into play. Sash is not a dynamic linked executable, it has actually all needed features built in. So as long as you can execute the sash binary, you can have a working shell. Let’s check it! Install „sash“ by using „aptitude install sash“ or you preferred package manager. Please note, that sash will clone your current root account:

cloning root account entry to create sashroot account in /etc/passwd
Cloned sashroot from root in /etc/passwd
cloning root account entry to create sashroot account in /etc/shadow
Cloned sashroot from root in /etc/shadow

So you have this new line in your /etc/passwd:

sashroot:x:0:0:root:/root:/bin/sash

You should consider giving sashroot a password if you want to be able to login with this account. But please check if this applies to your security needs.

See the difference

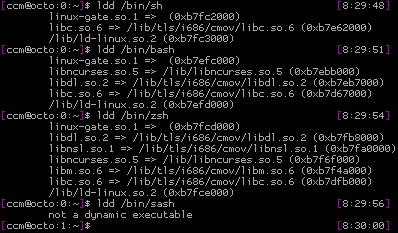
Now let’s check how the sash binary differs from the standard shell, the bash and the zsh. We are using „ldd“ for this, as it is lists libraries, an executable is linked against:
bildschirmfoto-terminal.png

Pretty impressive. All „normal“ shells have at least three dependencies, sash apparently has none.

But getting rid of external libraries is not the only difference sash makes. Another major feature is the collection of built-in commands:

-ar, -chattr, -chgrp, -chmod, -chown, -cmp, -cp,
-dd, -echo, -ed, -grep, -file, -find, -gunzip,
-gzip, -kill, -ln, -ls, -lsattr, -mkdir, -mknod,
-more, -mount, -mv, -printenv, -pwd, -rm, -rmdir,
-sum, -sync, -tar, -touch, -umount, -where

Seems like a list of commands you yearn for, when in recovery mode, don’t you? Note the leading „-“ at the beginning of those commands. This is the way, sash handles your attempts to run internal and external commands. When using „mv“, sash gives you the normal /bin/mv, when using „-mv“, sash provides you with it’s own replacement. But „sash“ helps you when you don’t want to type the „-“ at the beginning of every command. You can enter „aliasall“ in a sash session as it will create non permanent aliases for all builtin commands:

bildschirmfoto-terminal-1.png

Emergency

In case of an emergency you might need to boot directly into sash as maybe your initrd stuff is broken. How? Just append a „init=/bin/sash“ to your kernel command line – be it lilo or grub. This way, you will be directly dropped into a sash session.

What’s missing?

Sadfully one essential command is missing: fsck. As the sash manual points out: fsck is just way too big to be included in a statically linked binary. Sad, but true. But hey: Better being to able at least to act on the console than having no console at all.

Sash as a standard shell?

… is not a good idea. It just lacks a lot of features you’ll really want when working on the command line: A verbose prompt, command history, tab completion and so on.

So it’s to install sash now as you will miss it, when it’s too late :)
(And just if you’d like to ask: Yes, at least once I really needed sash and it helped me to save a lot of time.)

my package of the day: synergy and quicksynergy – share a single mouse, keyboard and clipboard between multiple computers

Once upon a time… I sat beneath a person who tried to show me something on his GNU/Linux desktop. As he noticed, he needs to copy a password from his Windows machine (was it OS X?), which was standing close, I waited for him to copy and paste by using his eyes. But hey: He just moved his mouse across the boarder of his screen and the mouse pointer appeared on the screen of the other computer. There he marked something, copied it to the clipboard by using the very keyboard, moved his mouse back to the first screen and pasted the content from the clipboard. I am neither talking about two screens attached to one computer, nor about a kvm device. You can probably imagine, how surprised I was…

The solution to this magic is rather simple. It is called „Synergy“ – a program available for GNU/Linux, Windows, OS X. It is a server/client application. Given the situation that you are mainly using one computer – let’s say your desktop, but also need access to your notebook, or even notebooks, standing left and/or right of your desktop screen, you make your desktop the synergy server. This is rather simple: Install the packages „synergy“ and for your convenience „quicksynergy“ – a graphical configuration wrapper – by calling „aptitude install synergy quicksynergy“ or just Synaptic on EVERY machine.

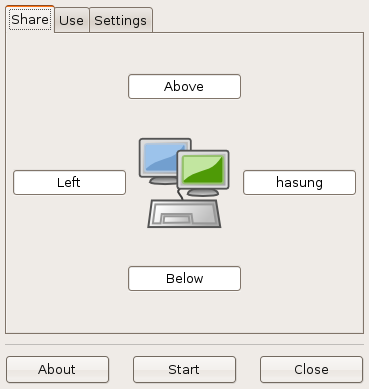
Now let’s get it running: First, start „Quicksynergy“ on your main computer (the desktop in this case) from your menu (you should find it under Accessories or Utilities). Click on „Settings“ to make sure, that the checkbox „Keep… running“ is not checked, as you probably don’t want to see Quicksynergy the whole time. Now go back to „Share“. You see you computer in the middle and four text boxes around it. The magic of Synergy is, that you need to know the hostname of the computer that wants to connect to your computer as Synergy relies on this information. If you are unsure, just run a „hostname“ on the console of the other machine.  I repeat: Don’t use fancy names, don’t use the ip address here – you need the hostname of the machine that will connect to your computer.

In my case my notebook is called „hasung“. Now decide, where the connecting computer/notebook is placed. In my case „hasung“ is right of my desktop screen. Therefore I enter the term „hasung“ into the text field labeled „Right“:

bildschirmfoto-quicksynergy.png

Afterwards clicking „Start“ will launch the Synergy daemon and fork the program into the background.

Now you have to find out the ip address of your main computer, as the computer/notebook beneath needs to connect to it. If you don’t know how to do this: open a console and run „ifconfig | grep inet“. If you are on a typical local area network, it will start with something like „192.“ or „10.“. Just check it out or ask somebody who knows. In my case the ip address is „192.168.1.2“.

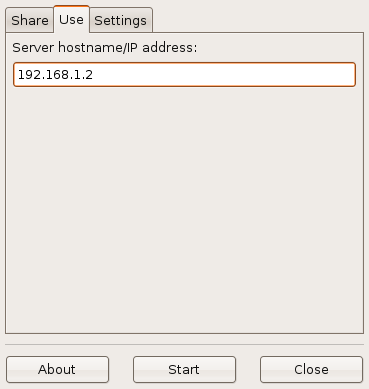
Now lay your fingers on the keyboard of your second machine – hopefully for the last time for today. You have two ways of connecting here – either by using quicksynergy or by using the command line. If you want a gui, start Quicksynergy, make sure, that the checkbox „Keep… running“ is not checked, on the „Settings“ tab, then click on the tab „Use“ and enter the ip address of your main machine, where the synergy daemon is already running. In my case „192.168.1.2“:

bildschirmfoto-quicksynergy-1.png

Click start and you should be up and running! Check this by using the mouse of your main computer and move the mouse pointer beyond the (right or left) screen frontier. The mouse pointer should appear on the other screen. You are done!

Network issues in Ubuntu Hardy

With Ubuntu Hardy suddenly strange things happened with synergy, as something on the network layer of the kernel has changed. The best workaround I know so far, is to run (quick)synergy on the client with sudo, so it does not get interrupted that often. As I am a heavy console user, I just run

$ sudo synergyc 192.168.1.2

from a terminal window instead of quicksynergy. If you have a better hint, let me know.

Firewall

Synergy opens a tcp port on the main machine. If you are using a firewall or even iptables manually you have to allow acccess to this port. Synergy uses port „24800“ by default. So if you know what you are doing, a „iptables -A INPUT -p tcp –dport 24800 -j ACCEPT“ might help you.

Staying on the same network

Actually your computers don’t have to be in the same network, but: The client machine has to be able to access the synergy tcp port on the master. Imagine the following: You are bringing your notebook to your company. It uses wifi while your desktop uses a cable connection. As your administrator does not trust wifi connections, he split the networks, so no direct connection from the wifi network to the cable network is possible. In this case you have to deal with your administrator. But trust me: synergy is not a reason for breaking company security rules :)

Security

From a security point of view, synergy is … let’s say… simple. There is no password protection, no security layer, no encryption. The only access control is the hostname of the client, which can, of course simply be forked. What does that mean? It means two things: First: People could annoy you by using your hostname on their machine and connect to your synergy instance. Counter measure? Ban them by using a local firewall, if you know, how. Second: People on the network might be able to sniff your data (mouse gestures, key strokes, content of the clipboard). Counter measures? Use a ssh tunnel! I won’t explain this here, but might already have a clue, what I am talking about.

Recovery

If your (quick)synergy forked into the background and you feel, that somehow it all does not work, open a terminal and run „pkill synergy“or „sudo pkill synergy“. This should stop all running instances.

Get more!

As might already have noticed, you can even connect more machines. Feel free to place machines to the left and right, even upper and lower side of your main screen at the same time.

So that’s for now. Feel free to post your experiences here, and yes: I am also using synergy in combination with hosts running Windows and/or OS X, though configuration on GNU/Linux with Quicksynergy is the best method I have seen.

my package of the day: file – classify (unknown) files and mime-types on the console

You know this? Somebody just sent you a mail with attachments that don’t have usable file extensions so you don’t really know how to handle them. Audio file? PDF? What is it? The same problem might occur after a file recovery, on web pages with upload features or just when you are really and time pressure and have time for messing around with file type guessing.

While you can try to give the file an extension and open it with a software you think might be suitable, the more sophisticated way is to let your computer find out what is all about. As a GNU/Linux user you probably already think „There is surely a command line tool for this“. Of course there is: The package „file„, that often gets automatically installed by dependencies or just an „aptitude install file“ will help you out.

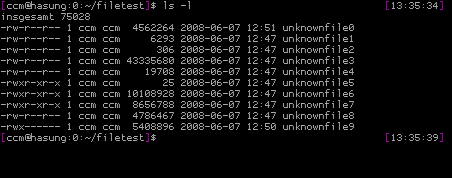
„file“ depends on „libmagic“ which provides patterns for the so called „magic number“ detection. You don’t have to know, what that is, but if you want, see this Wikipedia article for reference. So all you have to know, is how to handle the file command. And actually there is not much to learn. Let’s assume we have the following directory with unknown files:

file1.png

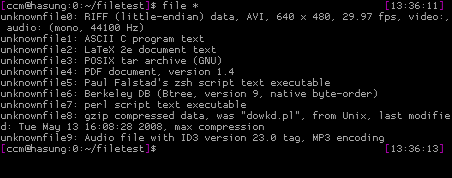
Now we want to know what’s inside those black boxes. Therefore we just call „file *“ on the console:

file2.png

Hey, that’s all. Pretty impressive, isn’t it? „file“ does even not only differs binary from text files, it even tries to guess what programming language a text file is written in. And the magic is not that much magic: In case of the zsh file it just sees a shebang pointing to the zsh in the first line of the file, a PDF file typically starts with „%PDF“ and so on. It’s all about patterns.

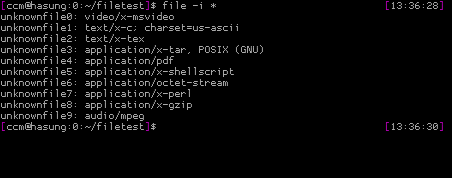
„file“ provides you with some command line options that make it’s usage even more helpful. The most interesting is „-i“ as it prints out mime types instead of verbose file types. If you are a web developer and want to know the exact mime type for a file download, this can save you a lot of time:

file3.png

Great, isn’t it? The Apache webserver also uses libmagic for this purpose. With „file“ you just use a wrapper for the same task.

That’s all about „file“ for today. Happy file detection – and feel free to report back.

my package of the day: fish – the friendly interactive shell

Always wanted to learn using a shell more deeply? Maybe „fish„, the „friendly interactive shell“ is the right kickoff for you.

If you are already a heavy command line user with customized .bashrc or even .zshrc (like me), thank you probably don’t need another shell. But if this shell thingy is somehow a miracle to you but you saw people using it like wizards with colorful commands and a typing speed that made you jealous then it could help you to start with a shell that concentrates on being very friendly to new users as common shells like Bash and ZSH expect you to read the manual and write a config file (there are aids and defaults that vary from distribution to distribution).

The standard shell for login users in Ubuntu/Debian is „Bash“. Ubuntu already ships the file /etc/bash_completion that is read by default and helps users using the TAB key more exensively. Try it on you bash shell: just type something like „ls –“ and press TAB twice. You’ll see a list of options that „ls“ provides. Nice but it could be nicer. Let’s compare this to fish. Install fish by using Synaptic or „aptitude install fish“, open a terminal and start the shell by typing „fish“. You should a changed green prompt. Now type „ls -“ and press TAB.

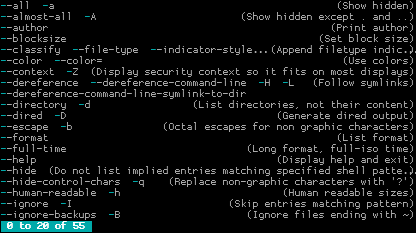
Stop: Already while typing you should see a strange color change. When entering „l“ the character turns red and underlined. Looks like an error? Well, it is: fish tells you, that „l“ is probably not a command. An aid during typing before running a command. Neat. Now, when pressing TAB you should a very clean list of options for „ls“ with a short description of each option:

fish11.png

Helpfull, isn’t it? Of course this is not limited to ls. Try it with other commands you are using. If you ask yourself why you have to type „command –“ and press TAB: „–“ introduces a command line option („-“ does this also – try it!). As you press TAB after this, the shells knows „the user wants to do something and needs help on completing it“. It looks after a pattern and sees that you want to use the given command and are looking for options. That’s all. As I said: This works in Bash often by default also, but not that nice.

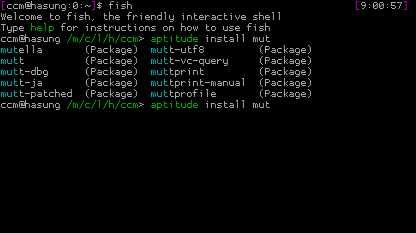
Now fish can do more with completion of course. Want to install a program? Try „aptitude install mut“ and press TAB. It will show you a list of packages matching that pattern:

fish2.png

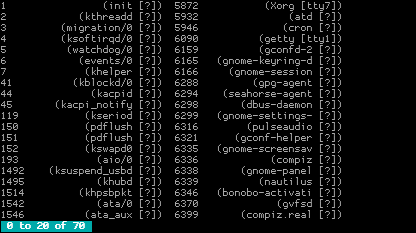
Need to kill a process? Type „kill “ and press TAB and you will get a nice list of running processes:

fish3.png

The list of possible TAB completions on fish is endless. Just notice that emphasis has been put on commands like mount, make, su, ssh, apt-get/aptitude. In most commands usernames, process ids will automatically be completed. The trick is just to try TAB when you are too lazy to type or unsure how to proceed. A good shell surprises you from time to time with it’s completion.

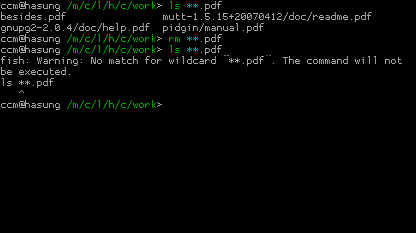
Also very helpful is the extended pattern matching for file names. Let’s say you want a list of all pdf files in a directory and all it’s subdirectories. On bash you probably use something like „find . -name „*.mp3“. On fish you use the pattern „**“ which means any files and directories in the current directory and all of its subdirectories. So type „ls **.pdf“ and you get the list you want as fish crawls through the directories for you. Want alle .mp3 and mp4 files but not files like .mpeg? Use „ls **.mp?“ as „?“ stands for one character. Of course commands like „rm **.bak“ are possible, too. Use them with care! In the following example we are looking for pdf files in all subdirectorie, delete them and afterwards make sure they are really gone:

bildschirmfoto-fish-mnt-cryptdevice-live-home-ccm-work-1.png

So let me stop here. I hope, I was able to show you that using fish instead of an unconfigured shell is a nice way of getting in the command line business. Fish provides you with a lot of more features that you might need and saves you from writing a config file from scratch.

If you want to give fish a try: Install it and run the „help“ command. I will launch a nice help page in you browser. Read some parts of the document as they’ll show you nice gimmicks. Or just don’t and start right away. But trust me: Reading hints for a shell from time to time will save you … time.

(Just in case you don’t know: You can change your standard shell by using the „chsh“ command. But when being a novice it is always a good idea to stick to the distribution specific default shell and run your shell directly by calling it. When you are more used to it feel free to make it your standard shell…)

my package of the day: weather-util (weather report and forecast for the console)

Let me introduce you today into a tool that a lot of people might evaluate as useless: Jeremy Stanley’s weather-util. Whith this tiny python script, which finally found its way into Debian Etch and Ubuntu repositories, you can retrieve weather information from weather stations worldwide directly from the command line.

After installing it by running „aptitude install weather-util“ or synaptec, call „weather“:

$ weather
Current conditions at Raleigh-Durham International Airport (KRDU)
Last updated Jun 04, 2008 - 01:51 AM EDT / 2008.06.04 0551 UTC
   Wind: from the S (180 degrees) at 10 MPH (9 KT)
   Sky conditions: mostly cloudy
   Temperature: 72.0 F (22.2 C)
   Relative Humidity: 73%

Pretty impressive, isn’t it? Weather just makes an http call to a weather server for a preset station (where the heck is Raleigh-Durham International Airport?) and returns the current weather information. Of course you can also retrieve the forecast for the next days by running „weather -f“:

$ weather -f
Current conditions at Raleigh-Durham International Airport (KRDU)
Last updated Jun 04, 2008 - 01:51 AM EDT / 2008.06.04 0551 UTC
   Wind: from the S (180 degrees) at 10 MPH (9 KT)
   Sky conditions: mostly cloudy
   Temperature: 72.0 F (22.2 C)
   Relative Humidity: 73%
City Forecast for Raleigh Durham, NC
Issued Wednesday morning - Jun 4, 2008
   Wednesday... Partly cloudy, high 67, 20% chance of precipitation.
   Wednesday night... Low 96, 20% chance of precipitation.
   Thursday... Partly cloudy, high 71, 10% chance of precipitation.
   Thursday night... Low 97.
   Friday... High 72.

Sadfully the forecast only displays Fahrenheit, but that way we have enough space for patching the package :)

Retrieving local weather information

Now we are, of course, we are interested in the weather in our area. The easiest way is getting the ID for a weather station. Just go to http://weather.noaa.gov/ and choose your country/city/station by using the drop down menus for US and international stations. When you found a station close to your point of interest you can see a four letter id in round brackets. See the example above – the airport has KRDU. I am using EDDI most of the times which is Berlin Tempelhof – an airport in the city center of Berlin.

So you are ready to ask politely for weather again by giving the id with „weather –id=ID“, in my case „–id=EDDI“. (note: you can also make it short with „-iEDDI“:

$ weather --id=EDDI
Current conditions at Germany (EDDI) 52-28N 013-24E 49M (EDDI)
Last updated Jun 04, 2008 - 01:50 AM EDT / 2008.06.04 0550 UTC
   Wind: from the E (080 degrees) at 13 MPH (11 KT)
   Temperature: 62 F (17 C)
   Relative Humidity: 59%

Please note: Not all weather stations support forecasts (-f) and drop a 404 http error. You just have to try this. You can also switch on „verbose“ mode (-v) which gives you even more details.

Weather on the command line without weather-util?

Works like a charm, doesn’t it? For the curious people around who want to understand where weather-util pulls the information from: See

http://weather.noaa.gov/pub/data/observations/metar/stations/

for reference. Just text files on a web server regularly updated. Click around and go to there parent dir – you’ll find even more interesting information. So using weather-util without weather-util should be not a big deal.

Screen integration

Now for the console lovers: You are using screen with a pimped status bar, don’t you? And in your wildest dreams you imagined the status bar showing the weather report, so you even don’t have to look outside the window because as a console guy you don’t even like your real „window“? No problem anymore by using screens backticks and weather-util.

As I noticed that weather-util runs into trouble from time to time when not being able to send it’s http request, I decided for a indirect weather pull by writing the information I need to a flat file by a cronjob. We just call weather-util and use awk to grab the snippet we need. I am interested in the temperature in Celsius. weather-util shows this line:

Temperature: 62 F (17 C)

So I use the following very quick and very dirty awk to get the „17“ out:

$ weather -iEDDI | awk '/Temperature/ {print $4}' | \
awk -F "(" '{print $2}'

Feel free to brush this up and report back. I am sure you can improve to use only one awk call instead of two.

You save this line to a shell script that is scheduled to run every five minutes and direct it via „>“ to write it’s output to a flat txt file. Within you .screenrc you read this file and display the contents in you status bar.
~/.screenrc:

startup_message off
defscrollback 1024
hardstatus on
hardstatus alwayslastline
backtick 1 0 300 cat /path/to/weather-text-file.txt

# remove line breaks made with "\"on the following lines
caption always "%{+b rk}$USER@%{wk}%H | %{yk}(Last: %l) %{gk} \
Weather: %1`C  %-21=%{wk}%D %d.%m.%Y %0c"
hardstatus alwayslastline "%?%-Lw%?%{wb}%n*%f %t%?(%u)\
%?%{kw}%?%+Lw%? %{wk}"

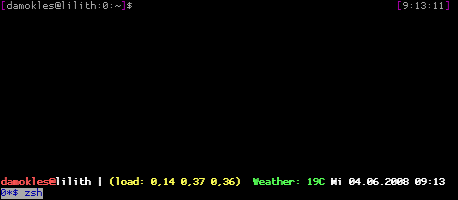
Make sure that have the file /path/to/weather-text-file.txt with the temperature in it. Now run screen and enjoy you shiny new status bar. See the green area in the screenshot below:
screen-weather.png

So that’s all for now. You should be able to play around with weather-util and screen to get the information you need (or let’s say „want“ :).

[update]

The incredible mnemonikk updated my awk | awk to a onetime sed within seconds:

$ weather -iEDDI | sed -n 's/.*Temperature:.*(\(.*\))/\1/p'

Thank you!

my package of the day: less (yes, less)

Let me tell you something about „less“: You are probably underrating it for no reason. Of course you know „less“ is always there and it does it’s job – showing files while being able to scroll backward – and some even use it instead of „tail“. But, hey, let’s examine some of the command line options to get more out of less:

-M: this option extends the prompt on the bottom. By default less in most cases just shows the name of the file it is showing, with „-M“ turned on, it also shows how many lines the files has, which lines it is currently showing and how far (in percent) you have gone. No killer feature, but nice to have.

-i: this option causes searches to ignore cases. A search for „pattern“ therefore also finds „PaTTerN“. You like this, don’t you? You like this even more, as this search still enables you to switch case sensitive search on by searching for a pattern containing at least one uppercase letter. A search for „Pattern“ for instance would still be case sensitive. If you even want to prevent this, you could use „-I“ which totally ignores cases.

-r: Sometimes getting warnings about binary characters? With „-r“ you tell less to display raw characters. This can help you when displaying files containing color codes. It is said that log files from Rails contain these types of code.

-c: Just a gimmick to redraw the screen more clearly by beginning from the top line instead of scrolling. This might result in a slightly increased data transfer rate when using ssh but can improve usability.

-a: This causes less to skip found search patterns when pressing „n“ not from item to item but from page to page. You might know the pain when searching for a pattern that comes up more than once on a page and you start hammering „n“ getting confused on what you have already seen and what not. This options just skips at least the current page before displaying the next found pattern while still marking all patterns of course.

-f: This can help you in conjunction with „-r“ to force the display of raw characters without being questioned again.

Confused about the sequence of the options? Don’t be:

$ less -Mircaf

is something you just learn or create an alias for.

This one, to sum up the options, will display an extended prompt, ignores cases in searches, while being able to switch them on, skip found search patterns at least per page, display raw characters like color codes without asking and redraws the screen as good as possible.

Another feature that should be mentioned is the „follow file“ mode that some of you might know. It is similar to tail as it shows you the content of a file that gets appended while viewing. You turn this mode on by pressing „F“ (uppercase F). The advantage over tail is that you can interrupt the mode by pressing ctrl-c and scroll back though still being able to return to follow by pressing „F“.

Not so familiar is the fact that you also can jump into the follow mode from the command line:

$ less +F

starts the follow mode immediatly. Of course typing „+F“ on the command line is not sophisticated as typing „tail“ but you can create an alias for it like „ltail“ or whatever you like.

As a summary:

$ alias eless="less -Mircaf"
$ alias ltail="less +F"

gives you two new commands. „eless“ as an extended less provides you with the described features. „ltail“ simulates „tail“ but enables you to jump back to the normal less by pressing ctrl-c.

Instead of creating an alias for „less -Mircaf“ you could also use the environment variable „LESS“:

$ export LESS="-Mircaf"

A credit goes to mnemonikk, who was just too lazy to blog this.

Please note: As less is still being developped, command line options might slightly change. For instance in newer version „-R“ instead of „-rf“ might lead to the same result. Just try it or check the version of less you are running („less –version“) against the official less changelog.

Ubuntu BBQ on 31th of May – End of Linuxtag

Ubuntu Berlin strikes again! On the 31th of May, this Saturday (and last day of the „Linuxtag“), Ubuntu Berlin is proud to present the „Ubuntu BBQ“ – an event you should not miss when staying in Berlin for attending „Linuxtag 2008„, live here or happen to be around by chance.

Hosted again by the sunken starship „c-base“ we are happy to provide you with drinks at low prices, and BBQ and entrance for … free! Sponsorships from Canonical Ltd. (you might have heard of them) and ubuntu Deutschland e.V. (thank you!) and an invitation from the Linuxtag Community staff made this possible and we are anxious to see how many Linuxtag attendees make their way to the base.

But it’s not about eating and drinking: The event gives you the possibility to meet a lot of GNU/Linux and Ubuntu interested folks, even some of the well known free software gurus in a relaxed atmosphere. Of course you can use a free wifi network with you notebook/gadget/whatever, but don’t forget: It’s a party. Music will be around and you can sit directly at the rivercoast of the „Spree“. It’s said the weather will be great.

You are invited the join us starting from 4 pm – the BBQ will start from 7pm – so you have enough time to come over from Linuxtag. We will arrange some groups you can join on Linuxtag making it easier for you to find the c-base. See more on our (yet only German) announcement.

One step forward, two steps back – AOL’s new „openness“

Great news! AOL finally opens it’s OSCAR protocol for developers by providing extended information through its OpenAIM program with a SDK, tutorials and all you need to build up aim compatible messengers or even bots. But is it that open? I mean, we know the difference between „open“ and „free“, don’t we? So a closer look at the license terms shows things you really don’t want to see and that are just unacceptable:

1. The „choose two from five“ rule:


„Additional Feature Requirements. Any Custom Client or Web AIM Developer Application that you distribute must include at least two of the following features or functionalities („Additional Features“) as an integral part of such distributed Developer Application:
  1. AIM Expressions. Inclusion of the capability for your users to choose and display a Buddy Icon to customize his or her user experience and provide a link to the AOL-Hosted AIM Expressions web page as documented in the AOL Additional Features document.
  2. AIM Toolbar. Inclusion of the AIM Toolbar as a user-selected option during the registration/download/installation process for the Developer Application, as applicable.
  3. AIM Start Page Launch. Inclusion of the launch of the AIM Start Page upon users. logon to your Site or to the Developer Application.
  4. Buddy Info. Inclusion of content provided by AOL that includes information about a user’s online status, including the user’s AIM profile, and AOL-supplied advertising.
  5. Advertisement. Inclusion of an AOL-provided display advertisement („Advertisement“) within your Custom Client, Site or activity window. Unless otherwise provided in a written agreement, all revenue from such Advertisement will belong to AOL.“

source: http://dev.aol.com/aim/license

So let’s say you want to develop a free, non-commercial client. Your best choice’d be choosing to implement „AIM Expressions“ and „Buddy Info“. That might be okay but it might be not. And actually it should be your decision, shouldn’t it? Even more interesting: What about console clients? Yes, they are around and it might be possible they haven’t ever heard of icons. Are they disallowed by default? Aren’t you free to choose a very different style of artwork for „expression“ by dropping the standard set and developing a new one?

2. The additional „hope to be unsuccessful rule“

Okay, this might be pettifoggery, but let’s also assume your client is implemented with the mentioned
requirements, people start to download your client, so it is widely used. Fine? Uh, yes, AOL thinks so too, as they are really interested in that:

„In addition to, and not in lieu of, the above requirements, in the event that the number of simultaneous users of your Custom Client or Web AIM Developer Application reaches a peak level of 100,000 at any time (as defined by AOL and provided at http://developer.aim.com/manageKeys.jsp) you must either: (i) within ninety (90) calendar days also include an Advertisement within your Custom Client, on your Site or the primary activity window of your Open AIM Developer Application, and discontinue any version of the Custom Client or Site/Activity Window that does not include an Advertisement; or (ii) within fifteen (15) calendar days, contact AOL at the following address: [email protected] and reach agreement on alternative arrangements satisfactory to AOL.“
source: http://dev.aol.com/aim/license

So what is this about? If your application is a success, make it commercial in a way. Free software is for a niche, big market shares are for winners? Be afraid of having 100.000 peak users? Stop distributing uncommercial clients if having success?

So, really thank you, AOL, for moving towars openness. But the way you define „open“ is not the way we mean it. It is not even „free beer“ you are giving away, it’s a glass of free beer with a big refund sticker on it. But you already showed that you know what is all about: Just a couple of weeks ago information about a xmpp/jabber aol/aim test server leaked and you might have noticed how enthusiastic people were. Stick to it, be brave! Other big companies already use it by default.

Think about companies forcing developers to implement similar „features“ into mail applications just because they transport mail to a specific domain, with a specific mime type or whatever. You would not like it? We don’t either. Make your protocol open and free. Your users are users – not customers, developers not employees.