my package of the day: mpd – the Music Player Daemon

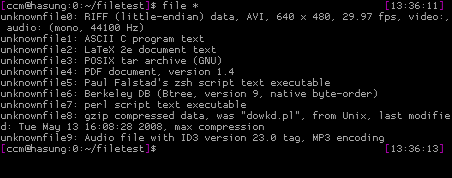
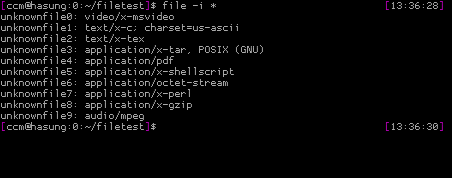
There are dozens of nice music players around, that’s for sure. You can choose between featur rich killer applications like Rhythmbox or Amarok, use old-school but up to date standards like XMMS or even a console classic like mp3blaster. Most of the standard players have in common, that the interface and the player itself are the same. That’s normal and therefore everything is fine. But maybe you are in a situation where you prefer playing music on a remote machine, only have a console or just don’t want your music player to stay open while playing. Huh?

Okay, again: Imagine, you set a machine dedicated for playing music. You put it into a corner, it has no keyboard, just a network interface. How do you proceed? Ah, you install mp3blaster via ssh and let mp3blaster run in the console, right? That’s fine and mp3blaster really kicks ass. But… With mp3blaster you are forced to have a shell account on the machine, just for playing music. Mp3blaster has a lot of features, but it has only one interface and you have to stick to it – and at least you also have to get into the „screen“ business for letting the player run while not being logged in.

So what’s the alternative? Well: Imagine a music player daemon, that keeps your music collection and listens for clients telling him, what to play next. You don’t even need to imagine the music player daemon, just have a look at the „Music Player Daemon“ – abbreviated „mpd“. It’s idea is to completely split user interface and player daemon, enabling you to choose between different user interfaces (from console to gui) and to manage a remote daemon without the need of logging into the machine directly.

Now let’s test it, right away. First, we install „mpd“ by calling „aptitude install mpd“. This will enroll the daemon and start it right away. „mpd“ organises its files in „/var/lib/mpd“ and expects music by default in „/var/lib/mpd/music“. Strange location, isn’t it? While you are free to configure the mpd daemon in /etc/mpd.conf, the easiest way of getting you music into the daemon is to symlink your directory/directories. I keep my music collection in /home/ccm/Music. Therefore I run „sudo ln -s /home/ccm/Music /var/lib/mpd/music/ccm“. Now you have to take a short break and think about access rights: While mpd runs as user „mpd“, which is a good idea, you need to make sure, that your music files are accessible to mpd. I ran into trouble as my mp3 files provided read access only the owner (me). Therefore I needed to decided whether to run mpd as „ccm“, chown my music to „mpd“ or to extend access rights. I decided for last version and just chmod’ed the music files and directories (see below). Now you need to tell mpd that there is new music around. Just run „sudo mpd –create-db“ and it should crawl your library quite fast. So until here we took the following steps:

# install mpd
$ sudo aptitude install mpd
# symlink current music to mpd music library
$ sudo sudo ln -s /home/ccm/Music /var/lib/mpd/music/ccm
# make sure, mpd can access the music
# please be careful with this
$ find /home/ccm/Music -type d -exec chmod 755 '{}' \;
$ find /home/ccm/Music -type f -exec chmod 644 '{}' \;
# tell mpd about the music
$ sudo mpd --create-db

A first graphical approach: Ario

Now let’s listen to some music! But stop: We need a client! Until now we only installed the daemon. An „apt-cache search mpd client“ gives you a brief overview over possible clients. I’d suggest you install „mpc“ (the classic command line tool), „ncmpc“ (an enhanced menu driven client), ario (a gtk client) for now, to see differences. Therefore run „sudo aptitude install mpc ncmpc ario“. Give ario a try if you prefer a gui. Like all clients, ario tries to connect to a mpd instance on the localhost by default. You should already see your music like this:

bildschirmfoto-ario.png

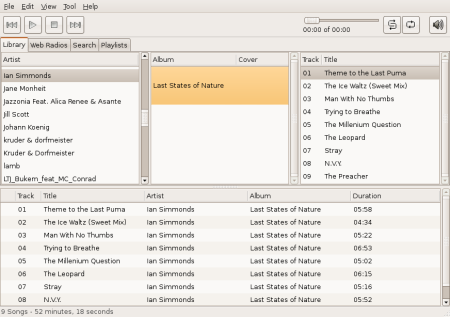
The mpd daemon expects a playlist from you. This is party on the lower side of the interface. Feel free to drag and drop the name of a band/musician, an album or even just a single track into this area and hit play. Hey, mpd play music! But that’s actually like the situation before…

A first console approach: ncmpc

For getting the difference, close the player by clicking on the X on the upper right side. Ario will totally disappear (feel free to check with „ps aux | grep ario“, but the music will continue to play. Nice. Now let’s get it even more abstract and open a console and start „ncmpc“. In this player you can switch to the different „tabs“ by hitting a key from 1 to 5. „2“ is the current playlist, „3“ a file browser. You can hit ENTER on a file in the playlist, and it will play, while DELETE will remove it from the playlist. In the browser, you hit SPACE on a directory and it will be added to the file list or ENTER on a single track. This way you can build a huge playlist very fast.

Let your command line completion work: mpc

With Ario and ncmpc you can already choose between a gui and console interface for controlling your music player. As I really like working on the console, I was happy to see, that the TAB completion from Bash and ZSH support the „mpc“ command, which is the standard console interface. With „mpc“ you will normale use one of the following commands:

# add a directory to the playlist
$ mpc add directory
# add a single track to the playlist
$ mpc add file
# play a track by number from the playlist
$ mpc play NUMBER
# show current playlist
$ mpc playlist
# update the current database as new files have been added
$ mpc update
# list all availabe music
$ mpc listall

If you are a ZSH user like I am, you will be pleased by the heavy TAB completion support. All commands and file names can be completed which actually makes you faster than bothering with any gui. The Bash support is okay, but not that sophisticated. If you don’t know, what I am talking about: never mind. You will, one day :)

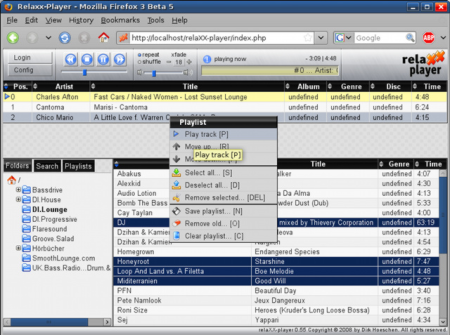
Let the browser work: Relaxx

A crazy Ajax guru here from Berlin wrote „Relaxx“, a nice web interface to mpd. Check out the project page for screenshots and the sourceforge page for downloads:

relaxx-light.png

I think this is enough for a first insight into „mpd“ and its clients. If you like the idea, you should read about connecting to remote mpd instances, so you are able to use your local client for a daemon running on a different machine, enabling authentication in mpd or maybe think about running mpd just on your local machine as it is a nice way of keeping your music collecting while being able to choose a client depending on the situation you are in. The mpd wiki is a great place to start gathering further information. You’ll find that a lot of utilities are available – from pidgin plugin for showing the music you are listening to a gnome panel applet. Always have in mind, how strong you are while being on the console as you can even use pipes when using mpc… Have fun.

my package of the day: proggyfonts – tiny fonts for programmers and console users

(Well, it is not yet a package, but trust me: I’ll make sure it gets one.)

As a programmer or console user you might know the pain of having not as much characters on you screen as you would like to. You tried around with different fonts, it got better by reducing font size but it is not yet perfect. If I tell you, that you just have the wrong fonts you probably moan „… I tried all installed fonts“. And you are right by that: The fonts I am going to tell you about are definitely not preinstalled.

I ran into the font trouble a couple of years ago. As my eyes are quite good I yearned for a really tiny font to overflow my brain with as much content as possible on the same time. After I a while I started a research on the web and found a page that already sounds like a perfect hit: proggyfonts.com. The site hosts 24 monospaced bitmap programming fonts (licensed under a free BSD-type personal license) enhanced for a small screen footprint and issues that programmers often run into like differing 0 (zero) from O (capital letter „o“).

Font comparison

The font I use is called „ProggyFont Tiny Slashed Zero“ which stands for: A real tiny font with a cleary slashed zero. To compare it to a „normal“ font let’s see it in action. Here you can see a default installed Monospace font which has been set up to a small font size:

bildschirmfoto-mc-hasung-mnt-cryptdevice-live-home-ccm.png

Concentrate on the characters you see above: They blur a bit. It’s not a big deal but if you are working with it for hours it gets one. Now let’s compare the same screen with ProggyFont Tiny Slashed Zero:

bildschirmfoto-mc-hasung-mnt-cryptdevice-live-home-ccm-1.png

See how clear the characters are? It even got smaller – you could handle one or two lines more within the same space if you would resize the window according to the previous one. What a relief!

Even more fonts

Now the example given is the most aggressive one as it is really small. You might consider other fonts as helpfull. Let me give you another example of a font: Proggy Clean (better to read as it is bigger) Slashed Zero Bold Punc – see yourself:

font.png

What have they done? They assume when you are a programmer you like characters like brackets, colons and so on being bold as the mean something in the code. Often you have to deal with interfaces that don’t mark those characters. Now the font does this for you. Nice, isn’t it? Now even cat and less show you bold coding elements without even configuring them to do so.

Installation

The site hosts the fonts in different formats. As I am lazy and is supported I only use the TTF font. To enroll a font in Gnome you have two ways depending on your Gnome version. First download a font package, unzip it, so you have file named fontname.ttf. To speak in Ubuntu versions: If you running Ubuntu Gutsy or below, open Nautilus, go to „fonts:///“ and drag and drop the ttf file into it and just restart your X session. If you have Hardy, create a directory called „.fonts“ in your home directory and copy the ttf file into it. Restart X afterwards (though not all applications depend on this).

Now open the application you want to enhace with your shiny new font. Let’s say it’s gnome-terminal. You should be able to choose a font named ProggySomething. Now you have to choose a font size and that is the only tricky thing to do: You have to find out the only possible font size. This setting might differ from application to application. In gnome-termin it is „11“ for instance which seems huge, but in fact is not. Just try it out. Under KDE or even Windows/OSX you’ll find out fast how to enroll the fonts. In fact it works, you just have to try.

So now you have a new set of fonts ready to boost your productivity. Make sure you don’t get a headache when using it and don’t crash your brain with an information overflow. I’ll report back when I packaged those fonts for a simple usage in Debian/Ubuntu.

my package of the day: file – classify (unknown) files and mime-types on the console

You know this? Somebody just sent you a mail with attachments that don’t have usable file extensions so you don’t really know how to handle them. Audio file? PDF? What is it? The same problem might occur after a file recovery, on web pages with upload features or just when you are really and time pressure and have time for messing around with file type guessing.

While you can try to give the file an extension and open it with a software you think might be suitable, the more sophisticated way is to let your computer find out what is all about. As a GNU/Linux user you probably already think „There is surely a command line tool for this“. Of course there is: The package „file„, that often gets automatically installed by dependencies or just an „aptitude install file“ will help you out.

„file“ depends on „libmagic“ which provides patterns for the so called „magic number“ detection. You don’t have to know, what that is, but if you want, see this Wikipedia article for reference. So all you have to know, is how to handle the file command. And actually there is not much to learn. Let’s assume we have the following directory with unknown files:

file1.png

Now we want to know what’s inside those black boxes. Therefore we just call „file *“ on the console:

file2.png

Hey, that’s all. Pretty impressive, isn’t it? „file“ does even not only differs binary from text files, it even tries to guess what programming language a text file is written in. And the magic is not that much magic: In case of the zsh file it just sees a shebang pointing to the zsh in the first line of the file, a PDF file typically starts with „%PDF“ and so on. It’s all about patterns.

„file“ provides you with some command line options that make it’s usage even more helpful. The most interesting is „-i“ as it prints out mime types instead of verbose file types. If you are a web developer and want to know the exact mime type for a file download, this can save you a lot of time:

file3.png

Great, isn’t it? The Apache webserver also uses libmagic for this purpose. With „file“ you just use a wrapper for the same task.

That’s all about „file“ for today. Happy file detection – and feel free to report back.

my package of the day: listadmin – moderate mailman mailing lists from the console

Are you involved in moderating Mailman mailing lists? Then maybe you know the pain: As you try to stop spammers flooding you list you hold messages from unknown senders back for review. Or you have a moderated mailing list that only allows postings explicitly published. However. In most cases you get mails from Mailman telling you that there are messages you have to moderate. The common way is to enter the web interface, enter your password, read the messages and discard/reject/allow them.

This workflow is easy but it can really get on your nerves as the web stuff is somehow time consuming. Therefore from time to time you get lazy on moderating…

Well, there is light at the end of the tunnel and one cannot repeat this hint often enough: The package „listadmin“ provides a powerful console tool for moderating mailman mailing lists. As Debian/Ubuntu user you just have to install it via „aptitude install listadmin“ on the console or via Synaptic. You just have to write an .ini file with the configuration (admin url, credentials). The files looks like this:

adminurl https://hostname.tld/mailman/admindb/{list}
default skip
log ~/.listadmin.log
password secret
[email protected][email protected]

So we just give an url with a placeholder named „{list}“. This way we can moderate multiple lists with fewer lines of configuration. Now let’s see how listadmin behaves when checking existing mailing lists (in this case our Berlin based Ubuntu mailing lists):

bildschirmfoto-damokleslilith-listadmin.png

Nothing to do – no messages to moderate in this case. But hey – we just got an incoming request. Let’s rerun listadmin and check:

bildschirmfoto-damokleslilith-listadmin-1.png

A spammer tried to hit our list. We now can decide wether to Approve, Reject or Discard the message. If it’s spam you want to discard as this just deletes the message. When you want to provide feedback to the user, you have to reject and are able to enter a reason. Of you course you also can examine the full body of the message or just skip it and keep for the next session. In our case „d“ was entered for deleting the spam and the request was submitted. If you are fast the session will not take more than 10 seconds – try this with the web interface!

So though it’s age and the ajax web 2.0 shiny wysiwyg plinkplonk alternatives Mailman provides you with nice wrappers for moderating larger amounts of mails within seconds. If you stick to a community you will probably sooner or later be asked to moderate a mailing list. Now you can say: „No problem. I have a command line tool for this“.

my package of the day: fish – the friendly interactive shell

Always wanted to learn using a shell more deeply? Maybe „fish„, the „friendly interactive shell“ is the right kickoff for you.

If you are already a heavy command line user with customized .bashrc or even .zshrc (like me), thank you probably don’t need another shell. But if this shell thingy is somehow a miracle to you but you saw people using it like wizards with colorful commands and a typing speed that made you jealous then it could help you to start with a shell that concentrates on being very friendly to new users as common shells like Bash and ZSH expect you to read the manual and write a config file (there are aids and defaults that vary from distribution to distribution).

The standard shell for login users in Ubuntu/Debian is „Bash“. Ubuntu already ships the file /etc/bash_completion that is read by default and helps users using the TAB key more exensively. Try it on you bash shell: just type something like „ls –“ and press TAB twice. You’ll see a list of options that „ls“ provides. Nice but it could be nicer. Let’s compare this to fish. Install fish by using Synaptic or „aptitude install fish“, open a terminal and start the shell by typing „fish“. You should a changed green prompt. Now type „ls -“ and press TAB.

Stop: Already while typing you should see a strange color change. When entering „l“ the character turns red and underlined. Looks like an error? Well, it is: fish tells you, that „l“ is probably not a command. An aid during typing before running a command. Neat. Now, when pressing TAB you should a very clean list of options for „ls“ with a short description of each option:

fish11.png

Helpfull, isn’t it? Of course this is not limited to ls. Try it with other commands you are using. If you ask yourself why you have to type „command –“ and press TAB: „–“ introduces a command line option („-“ does this also – try it!). As you press TAB after this, the shells knows „the user wants to do something and needs help on completing it“. It looks after a pattern and sees that you want to use the given command and are looking for options. That’s all. As I said: This works in Bash often by default also, but not that nice.

Now fish can do more with completion of course. Want to install a program? Try „aptitude install mut“ and press TAB. It will show you a list of packages matching that pattern:

fish2.png

Need to kill a process? Type „kill “ and press TAB and you will get a nice list of running processes:

fish3.png

The list of possible TAB completions on fish is endless. Just notice that emphasis has been put on commands like mount, make, su, ssh, apt-get/aptitude. In most commands usernames, process ids will automatically be completed. The trick is just to try TAB when you are too lazy to type or unsure how to proceed. A good shell surprises you from time to time with it’s completion.

Also very helpful is the extended pattern matching for file names. Let’s say you want a list of all pdf files in a directory and all it’s subdirectories. On bash you probably use something like „find . -name „*.mp3“. On fish you use the pattern „**“ which means any files and directories in the current directory and all of its subdirectories. So type „ls **.pdf“ and you get the list you want as fish crawls through the directories for you. Want alle .mp3 and mp4 files but not files like .mpeg? Use „ls **.mp?“ as „?“ stands for one character. Of course commands like „rm **.bak“ are possible, too. Use them with care! In the following example we are looking for pdf files in all subdirectorie, delete them and afterwards make sure they are really gone:

bildschirmfoto-fish-mnt-cryptdevice-live-home-ccm-work-1.png

So let me stop here. I hope, I was able to show you that using fish instead of an unconfigured shell is a nice way of getting in the command line business. Fish provides you with a lot of more features that you might need and saves you from writing a config file from scratch.

If you want to give fish a try: Install it and run the „help“ command. I will launch a nice help page in you browser. Read some parts of the document as they’ll show you nice gimmicks. Or just don’t and start right away. But trust me: Reading hints for a shell from time to time will save you … time.

(Just in case you don’t know: You can change your standard shell by using the „chsh“ command. But when being a novice it is always a good idea to stick to the distribution specific default shell and run your shell directly by calling it. When you are more used to it feel free to make it your standard shell…)

my package of the day: weather-util (weather report and forecast for the console)

Let me introduce you today into a tool that a lot of people might evaluate as useless: Jeremy Stanley’s weather-util. Whith this tiny python script, which finally found its way into Debian Etch and Ubuntu repositories, you can retrieve weather information from weather stations worldwide directly from the command line.

After installing it by running „aptitude install weather-util“ or synaptec, call „weather“:

$ weather
Current conditions at Raleigh-Durham International Airport (KRDU)
Last updated Jun 04, 2008 - 01:51 AM EDT / 2008.06.04 0551 UTC
   Wind: from the S (180 degrees) at 10 MPH (9 KT)
   Sky conditions: mostly cloudy
   Temperature: 72.0 F (22.2 C)
   Relative Humidity: 73%

Pretty impressive, isn’t it? Weather just makes an http call to a weather server for a preset station (where the heck is Raleigh-Durham International Airport?) and returns the current weather information. Of course you can also retrieve the forecast for the next days by running „weather -f“:

$ weather -f
Current conditions at Raleigh-Durham International Airport (KRDU)
Last updated Jun 04, 2008 - 01:51 AM EDT / 2008.06.04 0551 UTC
   Wind: from the S (180 degrees) at 10 MPH (9 KT)
   Sky conditions: mostly cloudy
   Temperature: 72.0 F (22.2 C)
   Relative Humidity: 73%
City Forecast for Raleigh Durham, NC
Issued Wednesday morning - Jun 4, 2008
   Wednesday... Partly cloudy, high 67, 20% chance of precipitation.
   Wednesday night... Low 96, 20% chance of precipitation.
   Thursday... Partly cloudy, high 71, 10% chance of precipitation.
   Thursday night... Low 97.
   Friday... High 72.

Sadfully the forecast only displays Fahrenheit, but that way we have enough space for patching the package :)

Retrieving local weather information

Now we are, of course, we are interested in the weather in our area. The easiest way is getting the ID for a weather station. Just go to http://weather.noaa.gov/ and choose your country/city/station by using the drop down menus for US and international stations. When you found a station close to your point of interest you can see a four letter id in round brackets. See the example above – the airport has KRDU. I am using EDDI most of the times which is Berlin Tempelhof – an airport in the city center of Berlin.

So you are ready to ask politely for weather again by giving the id with „weather –id=ID“, in my case „–id=EDDI“. (note: you can also make it short with „-iEDDI“:

$ weather --id=EDDI
Current conditions at Germany (EDDI) 52-28N 013-24E 49M (EDDI)
Last updated Jun 04, 2008 - 01:50 AM EDT / 2008.06.04 0550 UTC
   Wind: from the E (080 degrees) at 13 MPH (11 KT)
   Temperature: 62 F (17 C)
   Relative Humidity: 59%

Please note: Not all weather stations support forecasts (-f) and drop a 404 http error. You just have to try this. You can also switch on „verbose“ mode (-v) which gives you even more details.

Weather on the command line without weather-util?

Works like a charm, doesn’t it? For the curious people around who want to understand where weather-util pulls the information from: See

http://weather.noaa.gov/pub/data/observations/metar/stations/

for reference. Just text files on a web server regularly updated. Click around and go to there parent dir – you’ll find even more interesting information. So using weather-util without weather-util should be not a big deal.

Screen integration

Now for the console lovers: You are using screen with a pimped status bar, don’t you? And in your wildest dreams you imagined the status bar showing the weather report, so you even don’t have to look outside the window because as a console guy you don’t even like your real „window“? No problem anymore by using screens backticks and weather-util.

As I noticed that weather-util runs into trouble from time to time when not being able to send it’s http request, I decided for a indirect weather pull by writing the information I need to a flat file by a cronjob. We just call weather-util and use awk to grab the snippet we need. I am interested in the temperature in Celsius. weather-util shows this line:

Temperature: 62 F (17 C)

So I use the following very quick and very dirty awk to get the „17“ out:

$ weather -iEDDI | awk '/Temperature/ {print $4}' | \
awk -F "(" '{print $2}'

Feel free to brush this up and report back. I am sure you can improve to use only one awk call instead of two.

You save this line to a shell script that is scheduled to run every five minutes and direct it via „>“ to write it’s output to a flat txt file. Within you .screenrc you read this file and display the contents in you status bar.
~/.screenrc:

startup_message off
defscrollback 1024
hardstatus on
hardstatus alwayslastline
backtick 1 0 300 cat /path/to/weather-text-file.txt

# remove line breaks made with "\"on the following lines
caption always "%{+b rk}$USER@%{wk}%H | %{yk}(Last: %l) %{gk} \
Weather: %1`C  %-21=%{wk}%D %d.%m.%Y %0c"
hardstatus alwayslastline "%?%-Lw%?%{wb}%n*%f %t%?(%u)\
%?%{kw}%?%+Lw%? %{wk}"

Make sure that have the file /path/to/weather-text-file.txt with the temperature in it. Now run screen and enjoy you shiny new status bar. See the green area in the screenshot below:
screen-weather.png

So that’s all for now. You should be able to play around with weather-util and screen to get the information you need (or let’s say „want“ :).

[update]

The incredible mnemonikk updated my awk | awk to a onetime sed within seconds:

$ weather -iEDDI | sed -n 's/.*Temperature:.*(\(.*\))/\1/p'

Thank you!

my package of the day: less (yes, less)

Let me tell you something about „less“: You are probably underrating it for no reason. Of course you know „less“ is always there and it does it’s job – showing files while being able to scroll backward – and some even use it instead of „tail“. But, hey, let’s examine some of the command line options to get more out of less:

-M: this option extends the prompt on the bottom. By default less in most cases just shows the name of the file it is showing, with „-M“ turned on, it also shows how many lines the files has, which lines it is currently showing and how far (in percent) you have gone. No killer feature, but nice to have.

-i: this option causes searches to ignore cases. A search for „pattern“ therefore also finds „PaTTerN“. You like this, don’t you? You like this even more, as this search still enables you to switch case sensitive search on by searching for a pattern containing at least one uppercase letter. A search for „Pattern“ for instance would still be case sensitive. If you even want to prevent this, you could use „-I“ which totally ignores cases.

-r: Sometimes getting warnings about binary characters? With „-r“ you tell less to display raw characters. This can help you when displaying files containing color codes. It is said that log files from Rails contain these types of code.

-c: Just a gimmick to redraw the screen more clearly by beginning from the top line instead of scrolling. This might result in a slightly increased data transfer rate when using ssh but can improve usability.

-a: This causes less to skip found search patterns when pressing „n“ not from item to item but from page to page. You might know the pain when searching for a pattern that comes up more than once on a page and you start hammering „n“ getting confused on what you have already seen and what not. This options just skips at least the current page before displaying the next found pattern while still marking all patterns of course.

-f: This can help you in conjunction with „-r“ to force the display of raw characters without being questioned again.

Confused about the sequence of the options? Don’t be:

$ less -Mircaf

is something you just learn or create an alias for.

This one, to sum up the options, will display an extended prompt, ignores cases in searches, while being able to switch them on, skip found search patterns at least per page, display raw characters like color codes without asking and redraws the screen as good as possible.

Another feature that should be mentioned is the „follow file“ mode that some of you might know. It is similar to tail as it shows you the content of a file that gets appended while viewing. You turn this mode on by pressing „F“ (uppercase F). The advantage over tail is that you can interrupt the mode by pressing ctrl-c and scroll back though still being able to return to follow by pressing „F“.

Not so familiar is the fact that you also can jump into the follow mode from the command line:

$ less +F

starts the follow mode immediatly. Of course typing „+F“ on the command line is not sophisticated as typing „tail“ but you can create an alias for it like „ltail“ or whatever you like.

As a summary:

$ alias eless="less -Mircaf"
$ alias ltail="less +F"

gives you two new commands. „eless“ as an extended less provides you with the described features. „ltail“ simulates „tail“ but enables you to jump back to the normal less by pressing ctrl-c.

Instead of creating an alias for „less -Mircaf“ you could also use the environment variable „LESS“:

$ export LESS="-Mircaf"

A credit goes to mnemonikk, who was just too lazy to blog this.

Please note: As less is still being developped, command line options might slightly change. For instance in newer version „-R“ instead of „-rf“ might lead to the same result. Just try it or check the version of less you are running („less –version“) against the official less changelog.

removing outdated ssh fingerprints from known_hosts with sed or … ssh-keygen

At least from the last issue in Debian-based systems including Ubuntu you might know the pain of getting the message from you ssh client that the server host key has changed as ssh stores the fingerprint of ssh daemons it connects to. Actually this is a neat feature because it helps you detecting man in the middle attacks, dns issues and other things you probably should notice.

Until recently I opened the file .ssh/known_hosts in vim, deleted the entry, saved the file and started over again. I randomly checked „man ssh“ which gives you a lot of hints about the usage of known_hosts but I just did not find information about how to delete an old fingerprint or even overwrite it. I imagined something like „ssh –update-fingerpring hostname“ with an interactive yes/no question you cannot skip. There is the setting „StrictHostKeyChecking“ that might get you out of the fingerprint-has-changed-trouble but it does not solve the real problem as you want those checks.

So after hanging around with Mnemonikk discussing this he pointed out a very simple method with „sed“ that is really handy and helps you understanding sed more deeply. You can advise „sed“ to run a command on a specific line. So have a look at this session:

1
2
3
4
5
6
7
8
9
10
11
12
13
14
$ ssh secrethost
@@@@@@@@@@@@@@@@@@@@@@@@@@@@@@@@@@@@@@@@@@@@@@@@@@@@@@@@@@@
@    WARNING: REMOTE HOST IDENTIFICATION HAS CHANGED!     @
@@@@@@@@@@@@@@@@@@@@@@@@@@@@@@@@@@@@@@@@@@@@@@@@@@@@@@@@@@@
IT IS POSSIBLE THAT SOMEONE IS DOING SOMETHING NASTY!
[...]
Offending key in /home/ccm/.ssh/known_hosts:46
[...]
Host key verification failed.
$ sed -i "46 d" .ssh/known_hosts
$ ssh secrethost
The authenticity of host 'secrethost (1.2.3.4)' can't be established.
RSA key fingerprint is ab:cd:ef:ab:cd:ef:ab:cd:ef:ab:cd:ef:ab:cd:ef:ab.
Are you sure you want to continue connecting (yes/no)?

We just took the line number 46 which ssh complains about and run in in-place-editing mode (-i) with the command run on line 46 the command delete (d). That was easy, wasn’t it? Small lesson learned about sed. Thank you Mnemonikk (he is currently working on a screencast about screen if you let me leak some information here :).

But to be honest I’s still looking for the „official“ method the delete a key from known_hosts. Therefore I browsed through the man pages and finally found what I was looking for in „man ssh-keygen“. Yes, definitely zero points for usability as deleting with a tool named „generator“ is confusing but it works, however. You can advice ssh-keygen to delete (-R) fingerprints for a hostname which helps you when you turned hashed hostnames on in you known_hosts:

1
2
3
4
5
6
7
8
9
10
11
12
13
14
15
$ ssh secrethost
@@@@@@@@@@@@@@@@@@@@@@@@@@@@@@@@@@@@@@@@@@@@@@@@@@@@@@@@@@@
@    WARNING: REMOTE HOST IDENTIFICATION HAS CHANGED!     @
@@@@@@@@@@@@@@@@@@@@@@@@@@@@@@@@@@@@@@@@@@@@@@@@@@@@@@@@@@@
[...]
Offending key in /home/ccm/.ssh/known_hosts:63
[...]
Host key verification failed.
[ccm@hasung:255:/etc/ssh]$ ssh-keygen -R secrethost
/home/ccm/.ssh/known_hosts updated.
Original contents retained as /home/ccm/.ssh/known_hosts.old
[ccm@hasung:0:/etc/ssh]$ ssh secrethost
The authenticity of host 'secrethost (1.2.3.4)' can't be established.
RSA key fingerprint is ab:cd:ef:ab:cd:ef:ab:cd:ef:ab:cd:ef:ab:cd:ef:ab.
Are you sure you want to continue connecting (yes/no)?

So „ssh-keygen -R hostname“ is a nice syntax as you even do not have to provide the file name and path for known_hosts and it works with hashed names. Nevertheless I’ll also use the sed syntax – keep it trained it’ll help you in other cases also.

good howto: Bash Pitfalls

There is a very nice collection of common Bash scripting pitfalls and hints on how to avoid them on Greg’s Wiki: Bash Pitfalls

If you are writing little Bash scripts from time to time or are even a heavy Bash scripter, give it a try – it helps you avoiding errors that might work perfectly under normal circiumstances but suddenly go wrong… A good guide especially for writing server bullet proof scripts.

new kernel release detection snippet

Just a small and old snippet that might be helpful or an example: Some years ago I’s in need of getting to know early about new released Linux kernel versions. Therefore I wrote a (not sophisticated but working) crontabbed script checking the kernel page for a new stable Linux kernel and alerting me via mail if a new version is found with link to the changelog:

1
2
3
4
5
6
7
8
9
10
11
12
13
14
15
16
17
18
19
20
21
22
23
24
#!/bin/bash
CURRENTVERSION=`w3m -dump \
 http://www.kernel.org/kdist/finger_banner \
 | head -n 1 | awk '{print $10}'`
SAVEDVERSION=`cat ~/bin/kernelversion.log \
 | tail -n 1 | awk '{print $2}'`
SAVEDDATE=`cat ~/bin/kernelversion.log \
 | tail -n 1 | awk '{print $1}'`
MAILADDRESS=mail@address.tld
 
if [[ "$CURRENTVERSION" != "$SAVEDVERSION" ]]
  then
  CURRENTDATE=`date +'%Y-%m-%d'`
  echo "$CURRENTDATE $CURRENTVERSION" \
  >> ~/bin/kernelversion.log
  echo -e "Detected new kernel version \
   ${CURRENTVERSION} on ${CURRENTDATE} \
   (replacing version ${SAVEDVERSION} from\
   ${SAVEDDATE}). Please check \
   http://www.kernel.org/pub/linux/kernel/v2.6/ChangeLog-\
   ${CURRENTVERSION} forr details." \
 | mail -s "new kernel ${CURRENTVERSION}" \
 ${MAILADDRESS}
fi

The only real bug in this script is that it does not detect network issues and therefore alerts you when it is not able to get a http response. But this could be fixed with one or two lines of code. And yes most lines could be more elegant :) Probably today there are better channels like rss or even an old mailing list with announcements that I never looked for, but this snippet does it’s job very well.

update:

Fixed the broken wrapping of the script. Sorry about this. (Thank you Jeremy.)

Jonne stated that of course using a feed like http://kernel.org/kdist/rss.xml is the better choice today. He is surely right about this  though sometimes receiving a mail is a need.